Thursday, October 29, 2009

Cookie Brittle

I had never heard of cookie brittle before picking up an old cookbook at my library the other day. I mean, sure, I'd heard of peanut brittle, but cookie brittle ? Never!
This charming cookbook dated 1983 was from a local Church near here in Solebury, PA . The book is entitled " Bucks Cooks" and is described as a sequel to the original dated 1950.
It goes on to mention the little village of Solebury which boasts a post office and a public school, but has no stores, not even a gas station! Cute ! I actually think that remains true even today.
But enough about the village, let's get to the cookie brittle!
This cookie is rich and absolutely better than a chocolate chip cookie...in my opinion! The buttery goodness comes from a whopping 2 sticks of butter and in the recipe the author actually says

the cookie has 64 calories per inch ! So just a little bit, please !
To make it here's what you need to do.

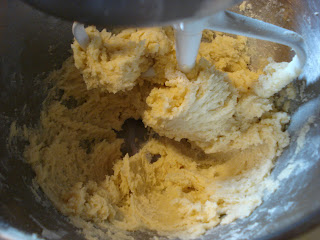
Cream butter. Slowly add salt, vanilla and sugar and beat til light and fluffy. Add flour and mix well. Stir in chocolate chips and pecans.

Dump the batter onto a parchment lined baking sheet and press, using your hands ( I used a rolling pin to get an even layer).


I didn't have a sheet pan to fit exactly so mine came out a little irregular. It did brown along the edges ( but this browned part is so good ! Just keep an eye on it once it reaches the full baking time.
Cookie Brittle
1 cup butter ( 2 stix)
1 tsp. salt
1 tsp. vanilla
1 cup sugar
2 cups flour
1 cup chocolate chips
1 cup pecans, chopped
1. In a large mixing bowl, cream butter.
2. Slowly add salt, vanilla and sugar. Beat til light and fluffy.
3. Add flour and mix well.
4. Stir in chips and pecans.
5. Using hands press dough into a 15 1/2" x 10 1/2" x 1" jelly roll pan. ( I used a sheet pan.), spreading to all edges.
6. Baked at 375 for 25 - 30 minutes or til brown at edges.
7. Cool in pan on rack.
8. Break into bite size pieces.
Note: The dough is very dry and crumbly and needs to be pushed down firmly into the pan.

Friday, October 23, 2009

Chocolate Chip Pumpkin Bread

I've had the recipe for this pumpkin bread for well over 25 years now. It's one of those no fail, easy to make, improves with age, and can be frozen kind of recipes. You can throw it together in no time flat and always have it available by making a few extra and popping them into the freezer.
All you do is get a very large bowl, put all your dry ingredients into the bowl, whisk, make a well in the center and dump in the rest of the ingredients and stir. That's it ! What you decide to add in is entirely up to you and what flavors you like with pumpkin. It can be chocolate chips. like the ones I made, chopped nuts such as pecans or walnuts, raisins ( my son's favorite) or maybe even some pumpkin seeds?

Chocolate Chip Pumpkin Bread

3 1/2 cups A.P. flour
2 tsp. baking soda
1 1/2 tsp. salt
1 tsp. cinnamon
1 tsp. nutmeg
Pinch ground ginger
Pinch of cloves
3 cups sugar
1 cup canola oil
4 eggs
2/3 cup water
2 cups canned pumpkin
1 cup chocolate chips ( or nuts or whatever you like)

Preheat oven to 350. Grease and flour loaf pans.
1. Combine dry ingredients in a large bowl and whisk to combine.
2. Make a well in the center and add remaining ingredients.
3. Mix til smooth.
4. Pour into loaf pans.
5. Bake 45 minutes to 1 hour ( depending on size of loaf pans.)
Yield : I used the smaller disposable pans ( 3" x 6") and this recipe made 6 loaves.
If you use the larger loaf pans it will make 2 loaves.
6. Let the loaves cool completely before turning out of the pans. This does improve and it really better the next day...or the day after..if there's actually any left !!

Wednesday, October 21, 2009

A Summerlike Day in the Country

It was such a warm summerlike day today, I thought I'd leave a little earlier for the farmers market, grab my camera and hit the country roads.
Bucks County does have some beautiful scenery and around every bend in the road you can find an abundance of farms, fields, barns or just a single tree standing alone in the sparkling sunshine.
When you experience the scenery in this county, it's easy to understand why so many artists and especially painters came here to paint this beautiful landscape.
One of those painters, Daniel Garber, was a Pennsylvania Impressionist painter who was best known for his large impressionistic scenes of the New Hope area.
Here it is over 60 to 70 years since he painted in the Bucks County area and much of the scenery has changed very little.
I hope you enjoy the views!!


Tuesday, October 20, 2009

Blueberry Lemon Scones

Before about 2 years ago, I had never eaten a scone, much less made one, but from the very beginning, as I researched this delicious breakfast treat, I knew that I had my work cut out for me. I mean scones have gotten a bad reputation. Most people expect them to have a kind of sawdust texture, dry and tasteless! So I tried tons of recipes and tweeked every one to get my own version just right, ( not just my opinion!), I knew I could not stop playing around with the recipe until I had everything just right.
Now, I'm happy to report that Saxby's Coffee Shop carries my scones in 3 of their locations and I sell out at the local farmers markets.
Well, I've decided to share...no, not my recipe!!...but my technique for making my scones.
If you want a good scone recipe, just check out the many excellent bakers' recipes on line. Dorie Greenspan has several, just to name one.
I've included lots of pictures so I hope you'll take the time of scroll down, view my step by step instructions and go forth and bake yourself some scones!!
One last note, the scones I chose to show are blueberry lemon. If you decide to make, let's say..cranberry orange, just swap out cranberries for blueberries and change the lemon zest to orange zest.
Put all the dry ingredients into a medium sized bowl and whisk. Zest about half a lemon into the dry mix and work it in with your fingers.


Make sure you have your fat(or fats) very cold. Cut into small pieces and again using your fingers, work the butter ( or butter and shortening) into the flour. Some pieces of fat will be the size of peas and some smaller, some larger.


The mixture should look like above.


It's very important to have all your utensils ready so you don't have to go fishing around in the drawers with sticky fingers to find something.
I use a bench scraper, spatula, fork, dinner knife.
Have a small bowl with about a half cup of flour nearby to flour your hands and the surface onto which you'll be working.
Also have a flat baking sheet (that will fit into your freezer) with a piece of waxed paper ready on the side because these guys are going into the freezer once they're all made and cut...you'll see!


In a small bowl, beat your egg then add the cream.

I throw in a handful of white ( golden) raisins for a bit of extra texture no matter what flavor I'm making.

Pour the wet ( egg and cream) into the dry ingredients and using the fork, stir the mixture gently. If it looks a bit dry, add just a teaspoon of cream at a time and stir.
Now is the time to add the berries. Just sprinkle about 1/4 to 1/3 cup into the mix and stir one or two more times with the fork.
Sprinkle your work surface with flour.
Replace the fork with a spatula.

Once you've replaced the fork with the spatula, dump the mixture onto a floured work surface.
Use your knife to scrape and remaining dough from the spatula ( it's easier to use a knife than getting your fingers all sticky).

Flour your fingers and gently press the dough on top to form a square. The dough should be approx. 1 1/2 inches thick. Use the bench scraper to make nice straight edges. Coat the scraper with flour to prevent sticking. You will be coating the scraper alot!
Once you have formed the dough into the square, coat the scraper on both sides and cut the square in half.

After you have cut the dough in half and you have 2 rectangles, dust the scraper once more with flour and scoop up each half and place onto the prepared sheet covered with waxed paper.
Place the dough rectangles into the freezer, no need to cover them at this point, and let them harden. This will take at least an hour, maybe more.
Once they have hardened, wrap them in the waxed paper and then put into a zip lock bag and put back into the freezer to be used later ( or you could bake them now).
I use this method of freezing, even if I want to bake them the same day. I just find they bake alot better frozen.
When you're ready to bake, preheat your oven to 400.
Take the scones out of the freezer and using a sharp large knife, cut the rectangles in half, then cut again to make triangles. ( You will be baking them frozen so don't allow them to thaw).
Place the triangles onto a parchment lined baking sheet. Space about 2 " apart.
Brush the tops of each scone with a little of the cream you used in making the scone. Then sprinkle with raw sugar to give them a bit of crunch.
Bake the frozen scones for about 23 minutes. Rotate the sheet pan about halfway through.
The tops should be golden.
They are absolutely best warm, just out of the oven. The outside is crunch and the inside is light and delicious!!
If you have any left over, you can always freeze them. (Thaw and warm in the oven.)


Sunday, October 18, 2009

Russian Grandmothers' Apple Pie Cake

This very long weekend of cold rainy weather gave me some extra time to try a few more recipes from Dorie Greenspan's Cookbook, "Baking From My Home To Yours".
My one big objection to this book is the lack of photos. I get very frustrated with a cookbook that doesn't show photos of the recipe or dish to be made. I did check other bloggers who had made this Russian Grandmothers' Apple Pie Cake before so I had a slight idea of how it would look, once baked.
I decided to halve the recipe, since, like the previous apple pie bars recipe I made, it would have been too much for just the 2 of us.
I hope you will pardon my lousy photos. I didn't even get a good shot of the finished, cut piece on the plate so I'm showing you the finished pie cake in the pan with a piece cut out! At least this way you can see what the inside looks like!
A few notes on the baking.
I set the timer for an hour but the top started browning and then almost looking like it was going to burn so I covered the edges in foil and let it go a bit longer but with almost 15 minutes left on the clock I decided to take it out of the oven, making the total bake time only about 45 minutes.
In her book, Dorie says to bake it 65 to 80 minutes. Yikes... it would have been totally burnt by then!
Because I took it out ahead of time, the apples didn't get really nice and soft so that didn't make me happy!
Still, it tasted very good. The crust was the best part! It had a wonderful flavor, a bit like a sugar cookie taste.
Maybe I chose the wrong type dish? I had to find a dish that was half the size called for in the recipe so the only one I could find was a small deep dish pyrex. Perhaps it was too deep?
Would I make this recipe again. Probably not. I , personally, like more of an apple crumb pie, but then I like a bit of crunch to offset the soft apple and crust.

Adding the lemon juice to the dough. It didn't really curdle like she said it might.


I did add a little bit more flour as Dorie says it might need. The dough came together very nicely.

The dough was actually very easy to work with. I just sprinkled a tiny bit of flour and patted it into a rectangle and wrapped it in plastic wrap and chilled it.


I cut up 5 apples but only used about 4. I used Golden Delicious and Gala. The recipe says to cut the apples 1/4 " thick, which I did but I think I could have sliced them a little bit thinner.


Place the dough into the pan and trim the excess along the edges to about 1/2".


You can see how much extra I had left of apples and raisins.


Ready for the oven. Sprinkled the top with sugar and cut slits into the top. Sure looks pretty!!


In the book Dorie says to cook til the top is a nice golden brown and the juices from the apples are bubbling up through the slits but this never happened.
I do think if I ever decide to make it again I will use a pie pan that isn't so deep.


Thursday, October 15, 2009

Butternut Squash Soup

Today was a totally miserable day, weather wise. Actually the next few days are supposed to be pretty awful. Rain and cold...a perfect soup day for sure!
I had to run out to deliver cookies to a local store that carries my goodies and I noticed in their refridgerated case some butternut squash soup for sale. It looked so good that I had to make my next stop the food store to buy the ingredients to make it.
I've made tons of soup in my time but never butternut squash soup so I checked out some recipes on line and kind of came up with my own version, adding some carrots...why?...don't really know...just because I felt like it!! It's really an easy recipe. What takes the longest time is roasting the veggies.
So, I guess you could really call this, Butternut Vegetable Cream Soup. Oh yea, I forgot to mention I put some cream in the soup, too! And I threw in a few fresh sage leaves I had in my garden.
Anyhoo, here's what I did.

I decided to roast the veggies first, rather than just boiling them, to bring out more flavor. Butternut squash, onions and carrots drizzled with some olive oil and salt and pepper on a sheet pan.

After they are finished roasting, let them cool about 5 - 10 minutes.

Butternut Squash Soup


2 lb. butternut squash, peeled and cut into chunks
2 medium carrots, peeled and cut into chunks
2 medium onions, peeled and cut into chucks
32 oz. box of chicken broth
olive oil
salt and pepper
pinch nutmeg
pinch cayenne
other spices I used: Ancho chili pepper
Garlic powder
Heavy cream or half & half
A few sage leaves ( if you have them).
Sour cream for garnish
1. Peel and cut into chunks the squash, onions and carrots.
2. Place onto a baking sheet and drizzle with olive oil and salt and pepper.
3. Bake at 350 for about 45 minutes or til the veggies are soft.
4. Let the veggies cool about 5-10 minutes, then place about 1/3 of them into a blender with some chicken broth ( about 1 - 2 cups ) and blend til smooth.
5. Repeat with remaining veggies and broth.
6. Place the smooth mixture into a large pan and heat on medium.
7. Add the spices, inlcuding the salt and pepper, tasting as you add to adjust to your taste.
8. Add a splash of cream and/or half & half.
Note: If you add the cayenne and ancho chili powder add just a pinch, really. Not too much to overpower the nice flavor of the soup.
9. Garnish with a dollop of sour cream and sage leaves, if you have them.

Sunday, October 11, 2009

Buttermilk Biscuits...an experiment in baking

Sometimes I can't believe how much baking goes on, by me, in my little kitchen. When I see it all together, ready to deliver to a store or, in this case, a cafe, I think about the time spent mixing, measuring, baking, packing and labeling all these treats. And I think, how'd I do all that!!...one woman and one very small kitchen!!
The biscuit experiment began Friday morning. This same cute little local cafe requested 2 dozen large buttermilk biscuits. Or I really should say they asked if I make them . Being one to never turn down work, I obliged. I haven't made biscuits in a very long time but since I make scones all the time I figured it was basically the same process...and it was!!
I found actually 3 recipes for the biscuits.
The first was Martha Stewart's recipe I found on line along with a video I watched about 5 times !!
The second recipe I found was Dorie Greenspan's.
The third was ..well.. I don't even remember. It used honey but they came out too heavy and I just eliminated it altogether!!
So from the 2 recipes I made, Martha's, in my opinion, having more butter in the recipe, spread a bit too much for that authentic "biscuit look".
The recipe I went with was Dorie's. They looked exactly like a biscuit and rose nicely, allowing them to be split in half. Don't get me wrong, however, Martha's tasted great but I went for the eye appeal!!
If you've never made buttermilk biscuits I urge you to try these. They are really so easy and they freeze very well. Freeze them, once baked, and take them out of the freezer to thaw at room temp. and pop into a 350 oven for about 6-8 minutes to warm.


Brownies, blondies, pumpkin and ghost iced cookies,2 flavors of biscotti and all those biscuits...ready for delivery!!

The lineup... first, on the left, is the one I totally eliminated. Next is Dorie's , then Martha's on the right. See the difference in the look?


Whisk all the dry in a medium bowl.


Drop in butter, cut into 12 pieces, and work into dry ingredients with your fingers. At this point, you could put the bowl into the fridge so the butter gets nice and cold again.


Add buttermilk and stir. I just folded the dough gently with the spatula a few times in the bowl, rather than using my hands to knead.


Cut out shapes using a round cutter. I made mine larger than you probably would need to.


And there they are! Beautiful, light, fluffy buttermilk biscuits!!
Dorie Greenspan's Buttermilk Biscuit Recipe
2 cup AP flour
1 tbsp. baking powder
1/4 tsp. baking soda
1 1/2 tsp. sugar
1/2 tsp. salt
6 tbsp. cold butter ( cut into 12 pcs.)
3/4 cup cold buttermilk
Preheat oven to 425. Line sheet with parchment paper.
1. Whisk 1st 5 ingredients in med. bowl.
2. Drop butter into dry ingred. and working with your fingers, rub butter into flour mixture, til the butter pieces are sizes of small flakes and small baby peas.( At this point it's a good idea to put the whole thing into the fridge for about 15 minutes so the butter gets nice and cold again).
3. Add buttermilk to mixture and stir gently til everything is combined.
4. Reach into bowl and knead gently 3 - 4 times. ( I used the spatula and just gently kind of kneaded it with the spatula).
5. Turn out onto a floured work surface and roll or pat into a circle 1/2 " thick. ( I made mine about 1" thick).
6. Cut out shapes and reroll scraps.
7. Place biscuits onto parch. lined sheet about 2-3" apart.
8. Bake 15-18 minutes.


Tuesday, October 6, 2009

Apple Pie Bars

In yesterday's post I went on about this month being all about pumpkins but it's also all about apples and this recipe is a nice variation on Apple Pie. I found this recipe in an older issue of Food & Wine from, March 2008. Although the recipe turned out great and quite a bit like apple pie, it's many steps make it a little too time consuming . Perhaps it would be easier to make each step a day ahead and assemble the whole thing the next day...don't know...just sayin'!! Just a note...I halved the recipe because it seemed like way too much for just the 2 of us and the original called for 12 apples...that's alot of apples!!
Step 1. Making the crust by beating with the paddle attachment in your mixer bowl.
Pat the dough with your fingers into a sheet pan covering all the bottom and 1/2" up the sides. Bake, set aside to cool.

Step 2. Making the filling. This was the time consuming part for me as I do everything by hand!! Peel, core and thinly slice apples. I didn't have the Granny Smith apples so I used what I had in the fridge which was a combo of Honeycrisp and Gala.


Put apples into a skillet with butter and cook. Add spices a little bit after and keep cooking!! This took longer than the 20 minutes.( More like 30 mins.) The apples released lots of juice so I scooped out the juice and saved it( it came to about 1/2 cup) and added it back in when it needed more liquid( instead of the water they tell you to use).


Step 3. Making the topping. I used my fingers to work the butter into the oatmeal and flour mixture. Your fingers get a real work out!! Add the toasted walnuts last.


Once the filling has cooled and the topping is made, spread the apples out over the cooled crust and cover with the topping, pressing down slightly with your fingers.
Whew!! Like I said...alot of steps . I think it would have been easier to just chop the apples but I think the point was to resemble an apple pie!! Just remember to add one last step...a big scoop of ice cream !!
One final note:
My son Kris had a great idea!! He suggested to drizzle caramel over the top...yes I agree!!
Also, it's easier to cut these bars once they are out of the pan so perhaps a longer piece of parchment paper for handles, to lift it out, would be a good idea.


LinkWithin

Related Posts with Thumbnails