Showing posts with label nut cookies. Show all posts

Wednesday, February 16, 2011

White Chocolate Macadamia Nut Cookies

This cookie recipe is from a book I just bought called, "Chocolate Bar" by Matt Lewis and Alison Nelson. The same Matt Lewis from the well known Brooklyn bakery, Baked. He had a shop before Baked in Greenwich Village, called Chocolate Bar; a kind of candy store for grown ups. So I looked forward to trying out some of the recipes in the book and the first one I tried was this cookie.

White chocolate and macadamia nuts...what a great combination! This cookie is rich and buttery not just from the butter used in the recipe but also from those buttery tasting macadamia nuts. The white chocolate adds a slight sweetness and pairs so well with the nuts.

I got all my ingredients together and started making the dough when I realized the recipe says to chill the dough for at least 6 hours. Oh no! I don't want to wait that long. I needed to show you these tonight! So I just popped a few into the freezer for about 10 minutes, then baked them. Guess what...they still turned out great but I can't wait for tomorrow when I'm sure they'll be even better...if that's possible!


Cream the butter and both sugars in a mixing bowl til smooth.
Add the eggs and vanilla and beat til very fluffy.

Sift the flour, baking soda and salt together in a small bowl and then add to the creamed mixture, mixing thoroughly til the batter is smooth.


Stir in the white chocolate chunks and the nuts and mix til just combined.
At this point you chill the dough.
After the dough has chilled, scoop out tablespoonfuls onto an ungreased baking sheet.
Bake the cookies for12 to 15 minutes.

Once baked, allow the cookies to cool on the baking sheet 8 to 10 minutes. Then transfer to a cooling rack.

White Chocolate Macadamia Nut Cookies ( from "Chocolate Bar" by Matt lewis and Alison Nelson) Recipe originally from Tammy Ogletree of CookieChick.
Makes 20 to 24 cookies.

1 cup (2 sticks) unsalted butter
1 cup light brown sugar
1/4 cup granulated sugar
2 eggs
2 tsp. vanilla
2 1/4 cup AP flour
2 tsp. salt
1 tsp. baking soda
8 oz. macadamia nuts, coarsely chopped (salted or unsalted)
8 oz. white chocolate pieces (or chunk chocolate), coarsely chopped
*************************
1. Sift the flour, baking soda and salt together in a small bowl and set aside.
2. In a mixing bowl, cream the butter with the sugars til smooth.
3. Add the eggs and vanilla, beating til very fluffy.
4. Add in the flour mixture, mixing thoroughly til the batter is smooth.
5. Stir in the white chocolate chunks and nuts and mix til blended.
Chill the dough for at least 6 hours.
6. Once chilled, drop the dough by tablespoonfuls onto an ungreased baking sheet, spacing about 2" apart. Bake 12 to 15 minutes.
7. Let the cookies cool on the baking sheet for 8 to 10 minutes, then transfer to a cooling rack.


Friday, January 21, 2011

Chocolate Peanut Cookie Bars

I have lost track of where this recipe came from. When I write down a recipe I like I usually jot down where the recipe came from under the title, but on this one I didn't, so..I can't give credit to anywhere.
Although this cookie bar bar came out great, I did make a few changes and I did mess up one thing...kind of!
The first change was the name. I am calling this a Chocolate Peanut Cookie Bar but I wrote it down as a Peanut Butter Cookie Bar...but it's not made with peanut butter so I changed it.

Next, I increase the amount of chocolate called for in the original recipe and I think it could have even used more and I coarsely chopped the peanuts for the topping, rather than leaving them whole.
And lastly, I kind of messed up the caramel topping..well, kind of! I'm still not sure if I made it correctly, but it came out fine, so..who knows!
It calls for making a caramel topping but I'm not sure how long I should have boiled the sugar mixture, so it didn't come out as dark as I think it should have..but it still worked.

The bars are a kind of sweet and salty combination and they came out with a nice crumbly crust and crunchy nutty top.


So, make the crust first, then bake it for 30 minutes.

I chopped up the topping peanuts a little bit. I didn't want large whole pieces on top.


Chop up the chocolate and sprinkle over the top of the cooled crust.

Make the caramel by combining the sugar, salt and water in a pan...
And bring it to a boil over medium heat, stirring til sugar is dissolved.
Then, don't stir it anymore, just swirl the pan occasionally til it turns a golden brown. ( You can see in my photo that the caramel isn't really a golden brown.)
Take it off the heat and add in the cream and vanilla carefully.
Stir til smooth.


Add in the peanuts and stir to combine.
Pour this mixture over the chopped chocolate and spread with the back of a spoon.
I actually had to pop it back in the oven for just one minute to help melt the chocolate.
You can speed up the cooling process by placing it in the fridge. It will help firm it up and make cutting easier.
Chocolate Peanut Cookie Bars


Crust:
1/2 cup unsalted peanuts, roasted
1 cup AP flour
1/2 cup sugar
Scant 1/2 tsp. kosher salt
8 tbsp. unsalted cold butter, cut into pieces

Topping:
1/2 cup sugar
Scant 1 tsp. kosher salt, divided. (scant 1/2 tsp. reserved to sprinkle on top of finished bar.)
2 tbsp. water
1/4 cup heavy cream
1/2 tsp. vanilla
1/3 cup finely chopped bittersweet chocolate ( I used 1/2 cup and would use a little more next time.)
1 1/2 cups unsalted roasted peanuts
*************************************
Preheat oven to 350. Butter a small baking pan ( I used my 7" x 11" pan).
1. Place the peanuts ( 2 cups total) in a single layer in a medium sized baking sheet and roast in a 350 oven for
about 8 minutes. Remove from oven and allow to cool a few minutes.
To make crust:
2. Combine 1/2 cup of peanuts, flour, sugar and the kosher salt in a food processor and pulse til nuts are ground and mixture is well blended.
3. Add butter pieces and pulse til mixture resembles cornmeal.
4. Press mixture into pan and bake for 30 minutes or til slightly golden brown.
5. Cool completely on wire rack.
To make topping:
1. Sprinkle the crust with the chopped chocolate.
2. Combine sugar, scant 1/2 tsp. the kosher salt and water in pan. Bring to a boil over medium heat, stirring til sugar is dissolved. Continue boiling, swirling pan occasionally til it turns a caramel color. Do not stir!
3. Remove pan from heat and carefully stir in cream and vanilla.
4. Stir nuts into the caramel mixture and pour over the chocolate. Spread with the back of a spoon.
5. Sprinkle scant 1/2 tsp. of the kosher salt over nuts. (I had to pop back into the oven for just a minute to melt the chocolate a little.)
6. Cool completely before cuuting. (Place into fridge to speed up cooling.)

Saturday, January 1, 2011

Maple Walnut Biscotti

Happy New Year! Thanks for all your wonderful comments throughout this year. It's been fun getting to know my readers and I'm looking forward to another year filled with recipes of all things baked to share with you.
To start the new year, I've chosen a biscotti recipe I found that not only sounded delicious but also allowed me to use some maple sugar that I bought at a Holiday craft show I did. Across the aisle a local company was selling lots of different items made with their delicious maple syrup, including this sugar.
This biscotti recipe is from King Arthur Flour and it sounded like such a great combo with walnuts and the flavor of maple. The only thing I didn't have was the maple extract, but it is optional in the original recipe so I just used a little vanilla extract instead.
Other than that, I didn't change a thing. The biscotti has a nice mellow flavor from the maple syrup. And with the butter in the recipe, it's crunchy but not too hard.

Mix the flour, baking powder and salt together in a medium bowl, then set aside.

In a mixer bowl, beat the eggs, sugars, maple syrup and maple flavor, if using.


Add the melted butter and beat til smooth.

Then add the flour mixture...

Then the walnuts.

Divide the dough in half and form into 2 logs. Sprinkle with maple sugar.
Bake for 30 minutes.
Let them cool 10 to 20 minutes. Then cut into slices 1/2" thick and place back onto baking sheet, upright rather than with slices laying flat.
Bake 20 to 25 minutes.

Maple Walnut Biscotti ( from King Arthur Flour)
Makes approx. 3 dozen 4" to 6" biscotti
2 cups walnuts, toasted and coarsely chopped
2 large eggs
1/2 cup granulated sugar
1/2 cup brown sugar, firmly packed
1/4 cup pure maple syrup
1/4 to 1/2 tsp. maple flavor, optional ( I used 1/2 tsp. vanilla)
1/3 cup butter, melted
2 1/2 cups King Arthur unbleached AP flour
2 tsp. baking powder
1/2 tsp. salt
2 tbsp. maple sugar, for topping, optional
**************************************
Preheat oven to 350. Line baking sheet with parchment paper.
1. To toast walnuts: Spread in single layer into a 9" x 13" baking sheet and bake in preheated oven 8 to 10 minutes, til they're light golden brown.
2. Mix together flour, baking powder and salt. Set aside.
3. In mixer bowl, beat together eggs, sugars, maple syrup and maple flavor, if using.
4. Add the melted butter, beating til smooth.
5. Mix in the flour mixture, then the nuts.
6. Divide the dough in half and using wet fingers, form into 2 logs approx. 10" long by 4" wide and 1/2" thick.
7. Smooth the top and sides of the rectangle, using wet hands. Then sprinkle the top with the maple sugar, if using.
8. Bake for 30 minutes, or til firm on top. Remove from oven and cool 10 to 20 minutes.
9. Using a serrated knife, cut slices, either straight or on the diagonal, a generous 1/2" thick.
10. Place the slices upright on the baking sheet ( without parchment paper now) and bake 20 to 25 minutes.
11. Cool on the baking sheet or transfer to wire rack.
Note: I like to store my biscotti in tins. This keeps them for weeks.


Wednesday, December 22, 2010

Potato Chip Cookies

I'm continuing to go through my old recipes and I remember baking these about a year ago..and I forgot how delicious they were!
They're buttery and crunchy and nutty and they'd make a great addition to your Christmas cookie line up!

I used ripple style kettle cooked potato chips so they have a crunchier bite and I prefer them to a regular potato chip for just that reason. And they're harder than a regular chip so they hold up better, once baked, in the cookie.

This cookie is an easy one to make and for the little effort involved, you'll be rewarded with a buttery crunchy sweet and salty cookie.
I don't actually crush the potato chips. Rather, I chop then a little to make sure they don't all wind up in little crushed bits.

Then chop the pecans well but not too finely.


When you add the potato chips into the dough, don't mix it too much. This will keep the chips from breaking too much more.

Scoop the dough and place onto a baking sheet lined with parchment paper.
Then press each ball of dough with the bottom of a glass or your fingertips.

Potato Chip Cookies
Makes about 2 dozen


1 cup unsalted butter, room temp.
1/2 cup granulated sugar
1 2/3 cup AP flour
1/2 tsp. sea salt or table salt ( I cut this down to 1/4 tsp. because my chips were very salty)
1 tsp. vanilla
1 generous cup potato chips, crushed or chopped but not to crumbs!
1/2 cup pecans, chopped between coarse and fine
Confectioners' sugar, for dusting
*********************************
Preheat oven to 350. Line baking sheet with parchment paper.
1. Beat the butter and sugar well, about 2 minutes.
2. Add in the vanilla and beat til blended.
3. In a medium bowl, whisk together the flour and salt and add to the creamed butter mixture, mixing well.
4. Stir in the chips and nuts, being careful not to overmix in the chips so they don't crumble too much.
5. Usingf a small cookie scoop or a teaspoon, scoop dough by teaspoonfuls onto parchment lined sheet.
6. Flatten each with the bottom of a glass or your fingertips, keeping them spaced about 2" apart.
7. Bake for 10 to 15 minutes, checking after 10 minutes. (They should be a light golden brown along the edges.)
8. Let them cool a few minutes on the baking sheet, then transfer to a wire rack and while still slightly warm dust with confectioners' sugar ( or coat completely if you like a sweeter cookie.

Wednesday, December 8, 2010

Linzer Cookies

Making cookies this time of the year can be stressful. So many different cookie types of make and coordinating your baking so you don't make the cookies too far ahead of when you're going to be giving them.
This is why I love cookies like these Linzer Cookies. They are so pretty and you can cut them out in any shapes you like, cut a decorative hole ( or two) out of the center, fill, sprinkle with powdered sugar and you're finished!
Now I know I've made that whole process seem like it takes no time at all..but with planning, you can prepare the dough ahead of time and just cut them out when you're ready.

Linzer cookies can be made with almonds, as these are, or you can use hazelnuts or even pecans. It just depends on which nut you prefer. You can also vary the filling, using..how about a chocolate filling with hazelnuts or even switching out the raspberry jam for another flavor.
This particular recipe uses cake flour which makes these cookies a bit more delicate.
Anyway you make them, one thing's for sure, they're delicious.
If I could give you one tip to making these, it would be to roll these cookies out thinly. Between 1/8" and 1/4" is perfect, in my opinion. Because the cookie is sandwiched, you're going to have two cookies stacked and you want them to be fairly delicate and light. If they're too thick, then it looses that nice light flaky quality. ( Did any of that make sense?!)
Whisk your dry ingredients in a medium bowl, then set it aside for a minute.

In a mixer bowl, cream the butter and sugar til light and fluffy.


In a small bowl, place the egg, yolk, lemon zest and vanilla.

Grind the nuts with a little bit of your sugar in the food processor to make them fine.

Add the egg mixture to the creamed butter mixture and beat well.
Then add the nuts and mix well.
Then add the flour mixture, adding in small batches til combined.
Place half the dough onto plastic wrap...

And roll to the 1/8" - 1/4" thickness, between 2 pieces of plastic wrap.
Chill the dough for an hour or two. Then at this point, you can just keep it in the fridge, covered well, til you need it or cut out your shapes ( half with a decorative center cut out).
Preheat the oven to 350 and place the cut out shapes about 2" apart on parchment lined baking sheets.
Bake, then cool completely on wire racks before filling.

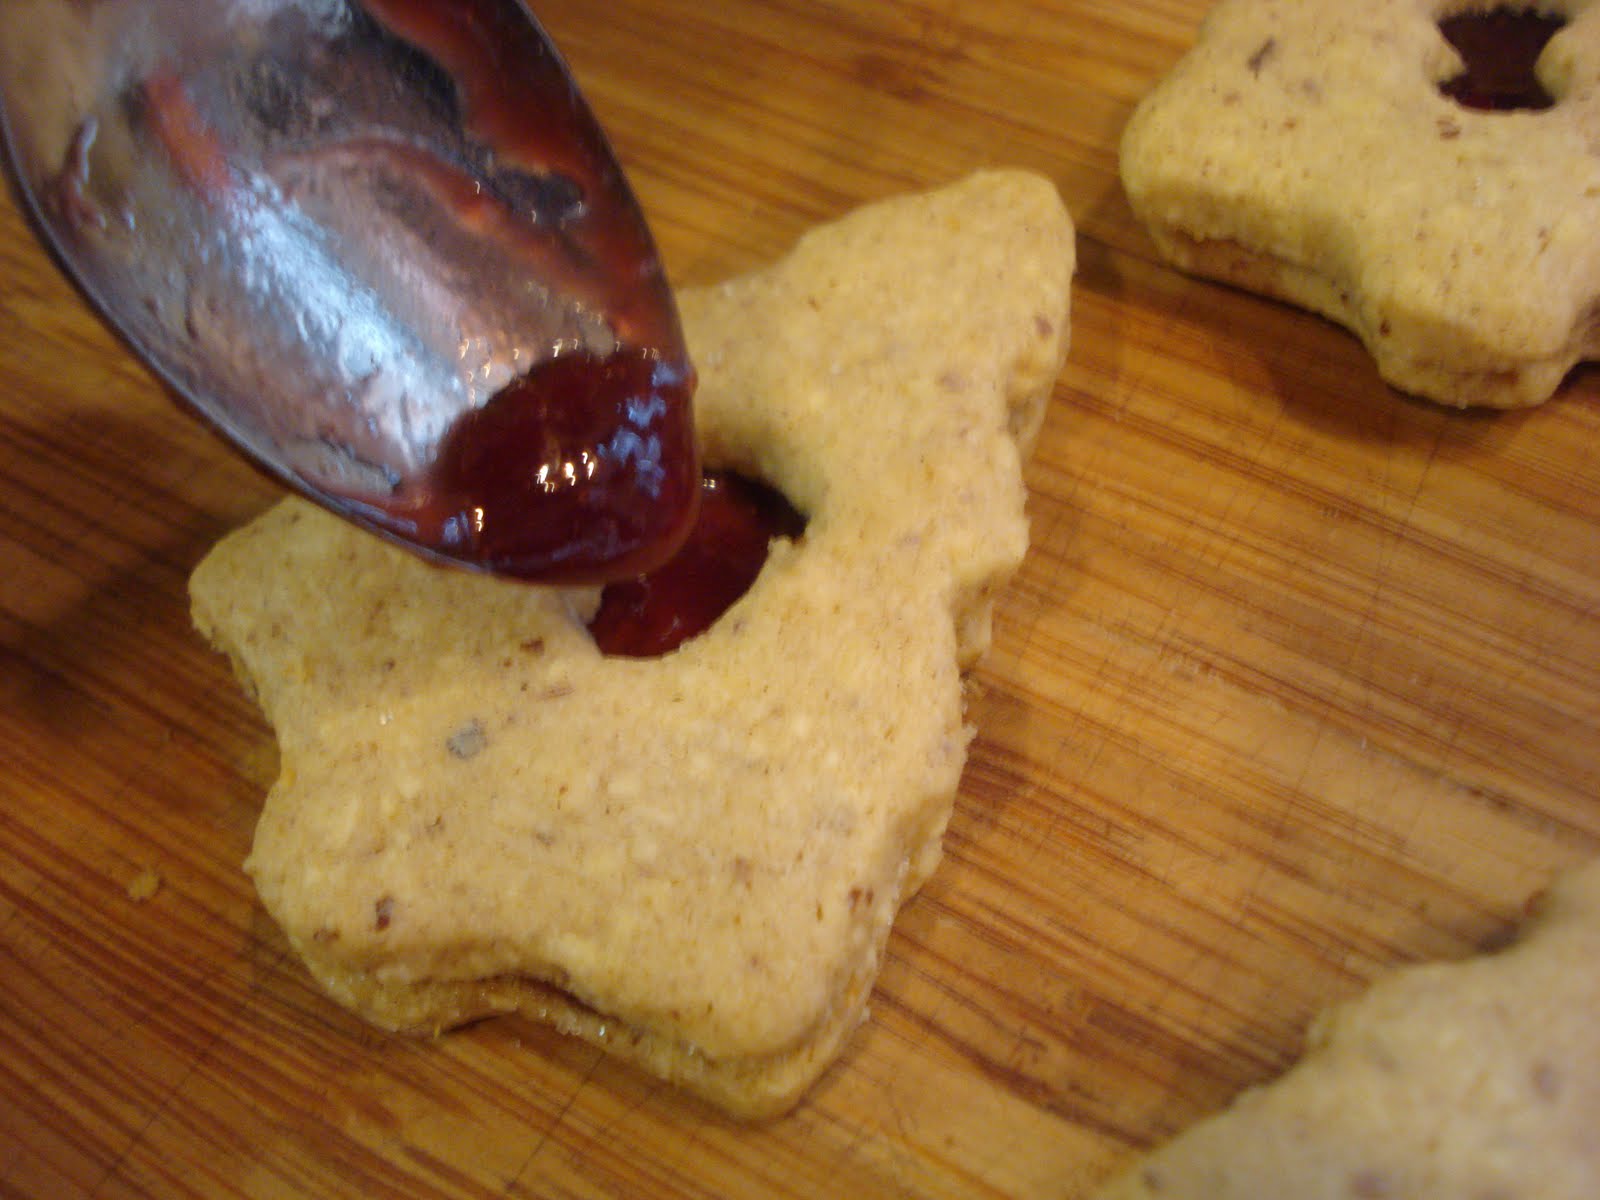
Place about one teaspoonful of jam onto each cookie bottom, then top with the other cookie with the cut out center.

Once you've sandwiched the two cookies, take a little more jam and place in the cut out section just to make it look more full and prettier!
Then dust with powdered sugar. You can pop them back into the fridge to help them set a bit.
Linzer Cookies (from "Culinaryinthedesert")

3 1/3 cups very finely ground almonds ( or other nut you'd like)( Also I toasted mine before grinding to bring out more flavor)
3 1/3 cups unsifted cake flour
1 tsp. baking powder
2 tsp. cinnamon
1/2 tsp. nutmeg ( freshly ground is best)
1 1/2 cups unsalted butter-softened
1 cup sugar
1 egg
1 egg yolk
1 tsp. lemon zest
1/2 tsp. vanilla
Raspberry jam or Nutella (or another flavor you'd prefer)
Confectioners' sugar for dusting
*********************************
1. In a medium bowl, whisk together flour, baking powder, cinnamon and nutmeg. Set aside.
2. In a mixer bowl, cream the butter and sugar til light and fluffy.
3. Place the egg, yolk, zest and vanilla in a small bowl, then add to the creamed mixture and beat well.
4. Blend in the ground nuts.
5. Add the flour mixture, one cup at a time beating til just combined. (Scrape the bowl on the sides and bottom from time to time to be sure to get all the dough incorporated.)
6. Divide the dough into 2 pieces and place on plastic wrap. Roll each between 2 pieces of wrap to 1/8" to 1/4" thickness. Chill dough for 1 to 2 hours. Or wrap well to bake at a later time.
7. Preheat oven to 350 and cut out shapes from the cold dough, placing cookies on baking sheets back in fridge if they get too soft or your oven's not up to temp. yet.
8. Bake approx. 12 minutes, or til edges are golden.
9. Once the cookies have cooled completely, spread a teaspoonful ( depending on the size of your cookie) of filling onto the bottom cookie. Then layer with the other cookie and fill a little bit of filling into the center space. Sprinkle with confectioners' sugar.
I'd store these cookies in a tin or in the fridge, covered well or in a zip lock bag.


Sunday, December 5, 2010

Lil's Hungarian Nut Cookies

Last year, about this time, I mentioned these cookies with a post for Kifli. The kifli are very good cookies but if you want a cookie that everyone will love this Holiday, then you must make these!
As I mentioned before, we don't really have a name for these. My mother in law, Lilian, shared the recipes with me and showed me how to make them many years ago and they've been our family's all time favorite cookie..really..all time favorite! She jotted down the recipe on a piece of scrap paper, which I've kept all this time. And this was a recipe her mother made, and probably her mother.
What's unusual is that the filling is just walnuts and white raisins with a little lemon juice and egg white. And the only sugar used is in the dusting of powdered sugar so they're certainly not too sweet. The pastry dough is also just a few ingredients, butter, cream cheese and flour. I've never seen a cookie like this anywhere, especially not with this filling.


They're not rugelach and they're not kifli. But what they are is a light flaky dough wrapped around a mildly tart, slightly crunchy, not too sweet little morsel, sprinkled with powdered sugar, that you can't stop eating! Really.
Now, they are pretty time consuming to make, so you'll probably want to keep them all for your family..but share. If only just a few!

You'll need to separate an egg, saving the yolk to brush the tops of the cookies just before baking.

Make the dough the night before and wrap in plastic and refridgerate.
Then take it out of the fridge and cut into 4 pieces to make rolling out easier.
(Oh, BTW, see that red plastic wrap? I bought it by mistake, not realizing it was red but I love using it. It's not as sticky as the clear wrap, making it so much easier to work with. Just thought I'd share that little bit of info!).
Working with one piece of dough at a time, roll out each piece as thinly as possible.
I even cut this piece in half again and roll more to get it very thin.
Then cut into tirangles, but not too big. We make these cookies kind of on the small size, about 2 1/2" long.
See how thin the dough is? It's about 1/16th of an inch thick.

Place a scant teaspoonful of filling into the triangle...

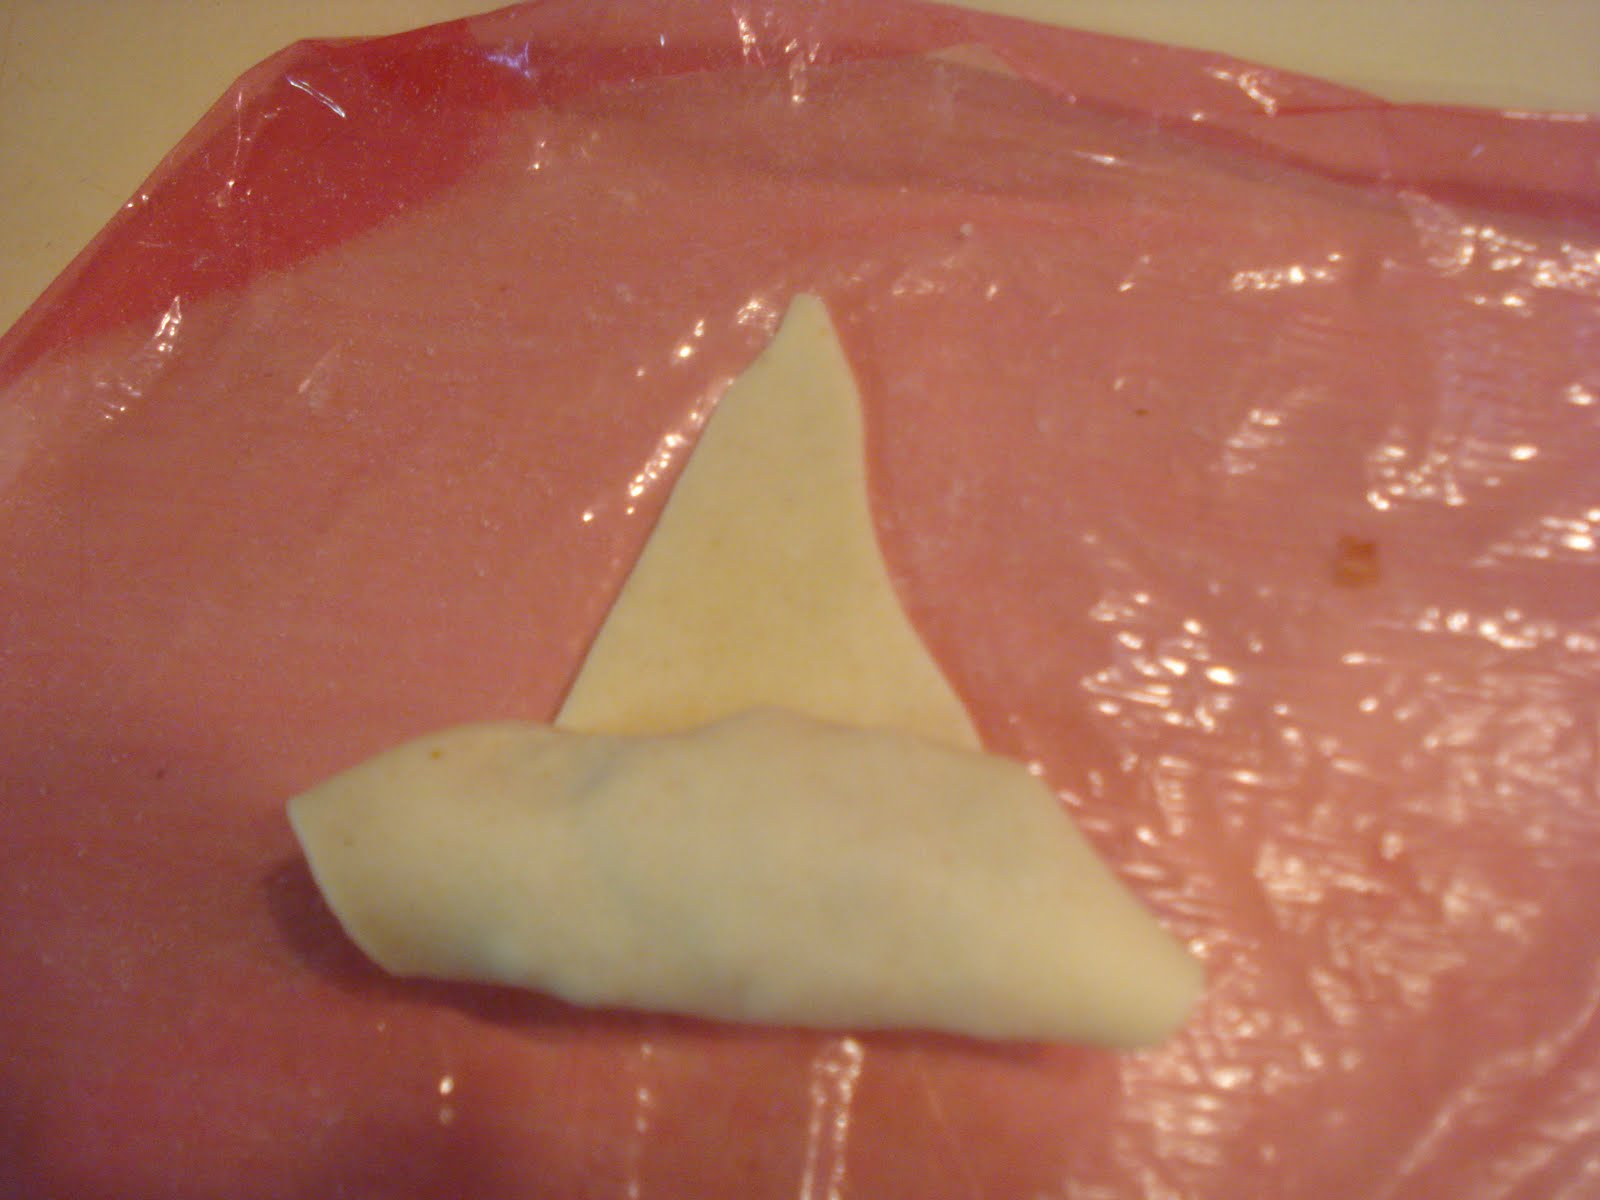
And begin by folding the two outer ends over the filling first...

Then fold over the bottom...( this folding procedure is the same way I was taught by Lil to make stuffed cabbage.) Must be a Hungarian thing!

Anyway, then keep rolling and press the tip down onto the dough to secure.
Place onto an ungreased baking sheet, once you have them all made, spacing them about 2" apart.
This just shows how important it is to get the dough really thin because sometimes I even roll each triangle again to get it really thin ( but I've been known to get a little obsessive about this!)

Brush the tops with the egg yolk and bake them til they're golden, about 15 to 20 minutes.
See how one of the tips wants to pop up. That's why you need to press it down so it stays in place while baking.

Then, while they're still hot, roll them in powdered sugar all over.
Then place on a wire rack to cool.
Lil's Hungarian Nut Cookies
Makes approx. 4 dozen cookies ( depending on the size you make them)
(The recipe below is written almost exactly as Lil wrote it on the scrap of paper.)
8 oz. sweet butter ( softened)
8 oz. cream cheese ( softened)
2 cups AP flour
Mix above ingredients-shape into a ball, wrap in waxed paper ( I use plastic wrap) and refridgerate overnight.
Filling:
1/2 lb. walnuts
1/2 lb. white raisins
1 egg white ( save the yolk to brush on top of the cookies)
A little lemon juice ( about 1 tsp.)
Preheat oven to 350. ( Lil's recipe said bake in a moderate oven).
1. Grind walnuts and raisins and mix with the egg white and lemon juice. ( I don't have a grinder, although when my oldest son was a baby, I used to use his babyfood grinder. LOL!) Anyway, just chop very finely.
2. Cut sections of dough and roll out til thin, then cut into triangles, about 2 1/2" at the bottom by 4 1/2" high. ( Refer to my photos and comments above).
3. Fill scant tespoonfuls of dough onto each triangle and roll up, again referring to my photos above.
4. Brush tops with egg yolk and bake til golden brown, about 15 to 20 minutes.
5. Sprinkle or roll each very warm cookie in powdered sugar and set on a wire rack to cool.
6. Store cookies in an air tight container or cookie tin. These are best when eaten within a day or two ( which should be no problem!)
Note: The dough ( rolled out slightly) as well as the unbaked cookies, can be frozen. Just wrap well and place in a zip lock bag. Thaw the dough, then roll out more. I would thaw the cookies a little before baking but you may need to add some extra baking time.


LinkWithin

Related Posts with Thumbnails