Showing posts with label sandwich cookies. Show all posts

Friday, April 1, 2011

Malted Milk Sandwich Cookies

I wanted to make another cookie with malted milk so this time I chose a recipe from "Baked"

I mean, you really can't go wrong with anything those "Baked" guys make! This one's so so good.
Again, I love the creaminess of the cookie from the malted milk. There's dark brown sugar in the cookie, which I think adds another layer of flavor...a little more caramel flavor.

If I could change one thing, it would be the filling, it's a tad sweet and I'm never too crazy about comsuming shortening. I'll use it when it's absolutely necessary...but I really try to avoid it when I can. In this case, I think next time I'll just go with all butter.

But seriously, my older son had no problem gobbling down a few! He said, Hey Mom, I love those pie cookies! Guess he thought they were like whoopie pies!


Whisk your dry ingredients and set aside.


Beat the butter and sugars together til they're light and fluffy.
Add the eggs, then the sour cream and vanilla...


Then add half the dry ingredients all at once and beat 15 seconds ( not 16! Ha!).
Then add the remaining dry ingredients and beat til just incorporated.


Divide the dough into 2 balls, wrap in plastic and chill in the fridge for 3 hours.


Preheat your oven to 350 and take out one of the portions of dough.
Sprinkle a little flour on a work surface (I used 2 pieces of plastic wrap) and roll out the dough to 1/4" thickness.
Cut out your shapes, then reroll scraps. Pop back into the fridge to keep them cold as your roll out the others.
Place them onto your baking sheet and bake for 10 to 12 minutes.


Malted Milk Sandwich Cookies (from "Baked")

Cookies:
4 cups AP flour
3/4 cup malted milk powder
2 tsp. baking powder
1/2 tsp. baking soda
1/2 tsp. salt
1 cup (2 sticks) unsalted butter, room temp.
1 cup firmly packed dark brown sugar
1 cup white sugar
2 eggs
1/3 cup sour cream
2 tsp. vanilla

Filling:

5 oz. vegetable shortening
4 tbsp. unsalted butter, room temp., cut into small pieces
3 1/4 cups confectioners' sugar, sifted
1/2 tsp. salt
1 tbsp. vanilla
1 tsp. light rum ( I think this is such a small amount that you could just use water)
************************
1. Whisk the flour,malted milk powder, baking powder, baking soda and salt together in a medium bowl and set aside.
2. In a mixing bowl, beat the butter and sugars til light and fluffy.
3. Add the eggs, one at a time, beating til each is incorporated.
4. Add the sour cream and vanilla and beat til just incorporated.
5. Add half the flour mixture all at once and beat 15 seconds, scrape the bottom and sides of the bowl to be sure the mixture is well combined.
6. Add in the remaining flour mixture and beat til it's just incorporated.The mixture will come together in a mass.
7. Divide the dough in half and wrap each half in plastic wrap, then place into the fridge for 3 hours.
8. Once it's chilled, preheat the oven to 350 and take out one of the balls of dough.
9. On a lightly floured surface or between 2 pieces of plastic wrap, floured, roll out the dough to 1/4" thickness and cut out your shapes.( A 2" round cutter is a good size).
10. Place the cookies onto your baking sheet and pop into the fridge to keep cold as your cut out the others. Keep the dough cold, chilling the cookies, once they're cut out. ( or even placing in the freezer 5 minutes will help them keep their shape.)
11. Bake 10 to 12 minutes ( Mine took 12 minutes). Then let them cool a few minutes on the baking sheet, then transfer to a wire rack to cool completely.
12. Place the filling onto one of the cookies and top with another to make a sandwich.
Filling: 

1. Beat shortening and butter in a small bowl til creamy.
2. Add the confectioners' sugar in 3 additions, mixing each addition til combined.
3. Beat in the salt, vanilla and rum and beat 10 seconds.
The filling should be thick but spreadable. If too thick, add a few drops of water, if too thin, add a little more confectioners' sugar.

Wednesday, December 8, 2010

Linzer Cookies

Making cookies this time of the year can be stressful. So many different cookie types of make and coordinating your baking so you don't make the cookies too far ahead of when you're going to be giving them.
This is why I love cookies like these Linzer Cookies. They are so pretty and you can cut them out in any shapes you like, cut a decorative hole ( or two) out of the center, fill, sprinkle with powdered sugar and you're finished!
Now I know I've made that whole process seem like it takes no time at all..but with planning, you can prepare the dough ahead of time and just cut them out when you're ready.

Linzer cookies can be made with almonds, as these are, or you can use hazelnuts or even pecans. It just depends on which nut you prefer. You can also vary the filling, using..how about a chocolate filling with hazelnuts or even switching out the raspberry jam for another flavor.
This particular recipe uses cake flour which makes these cookies a bit more delicate.
Anyway you make them, one thing's for sure, they're delicious.
If I could give you one tip to making these, it would be to roll these cookies out thinly. Between 1/8" and 1/4" is perfect, in my opinion. Because the cookie is sandwiched, you're going to have two cookies stacked and you want them to be fairly delicate and light. If they're too thick, then it looses that nice light flaky quality. ( Did any of that make sense?!)
Whisk your dry ingredients in a medium bowl, then set it aside for a minute.

In a mixer bowl, cream the butter and sugar til light and fluffy.


In a small bowl, place the egg, yolk, lemon zest and vanilla.

Grind the nuts with a little bit of your sugar in the food processor to make them fine.

Add the egg mixture to the creamed butter mixture and beat well.
Then add the nuts and mix well.
Then add the flour mixture, adding in small batches til combined.
Place half the dough onto plastic wrap...

And roll to the 1/8" - 1/4" thickness, between 2 pieces of plastic wrap.
Chill the dough for an hour or two. Then at this point, you can just keep it in the fridge, covered well, til you need it or cut out your shapes ( half with a decorative center cut out).
Preheat the oven to 350 and place the cut out shapes about 2" apart on parchment lined baking sheets.
Bake, then cool completely on wire racks before filling.

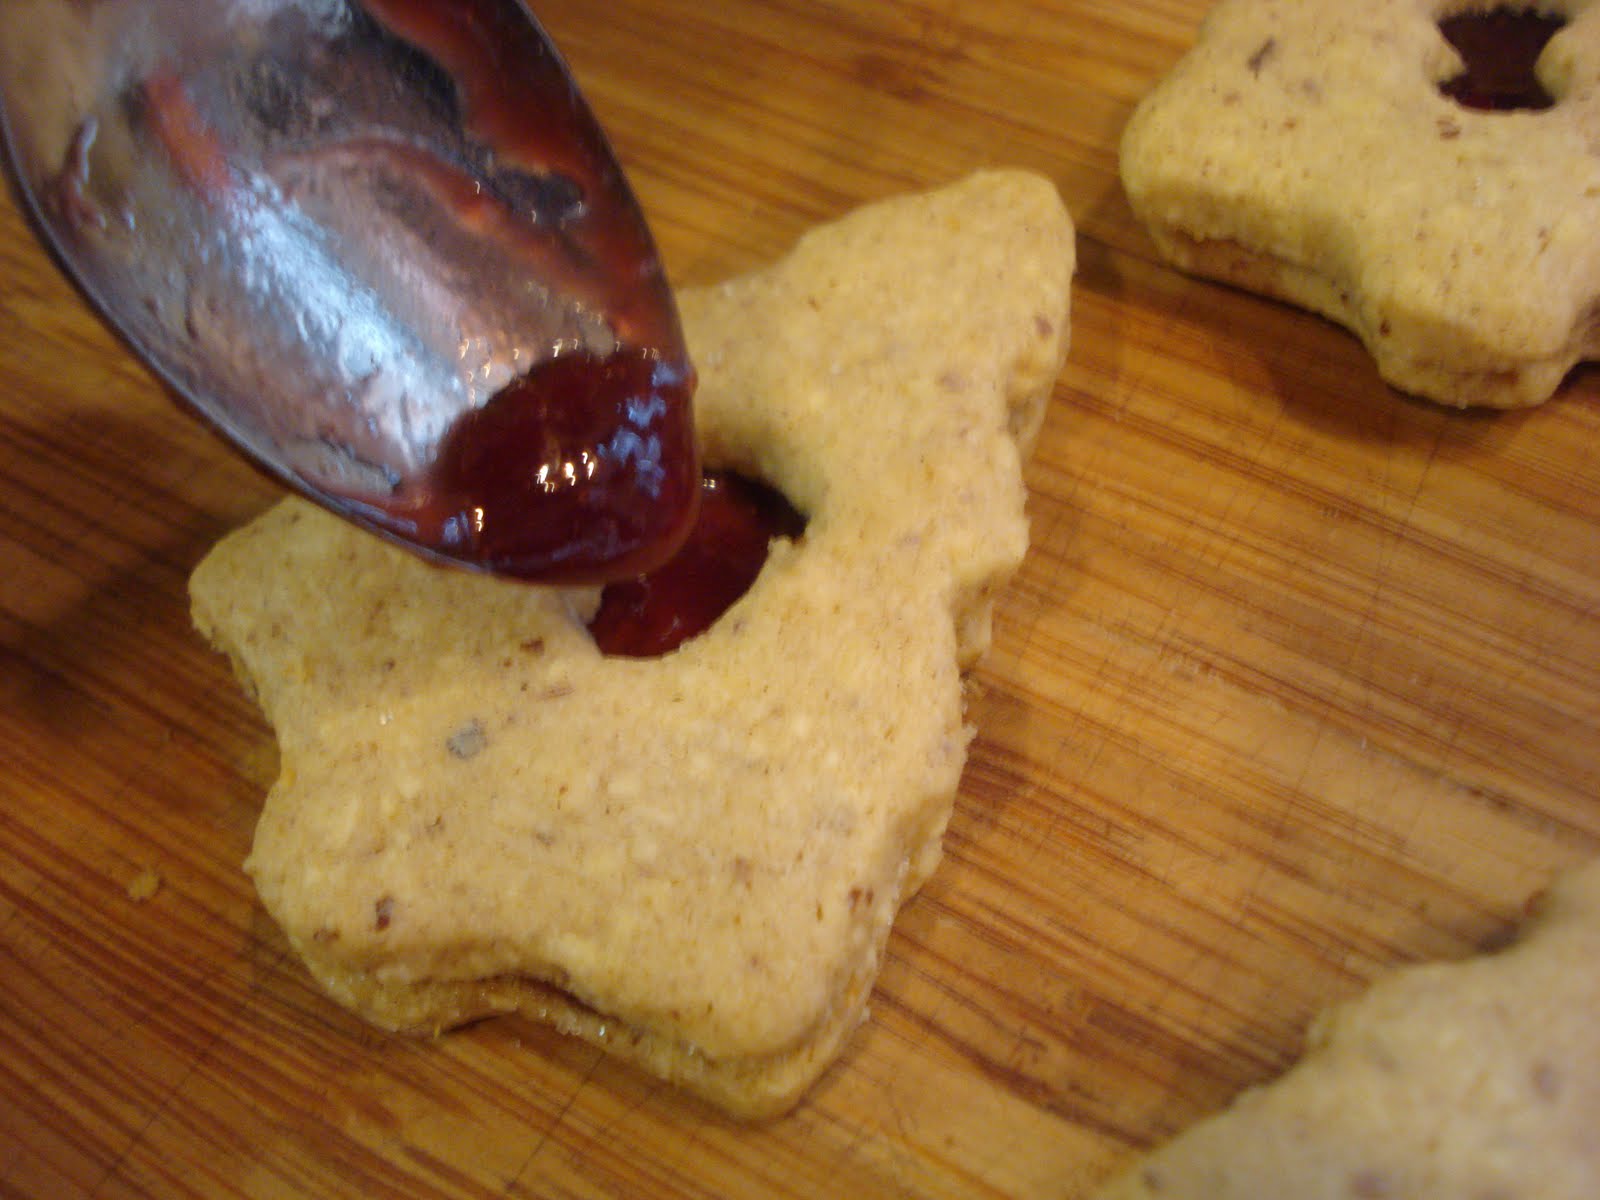
Place about one teaspoonful of jam onto each cookie bottom, then top with the other cookie with the cut out center.

Once you've sandwiched the two cookies, take a little more jam and place in the cut out section just to make it look more full and prettier!
Then dust with powdered sugar. You can pop them back into the fridge to help them set a bit.
Linzer Cookies (from "Culinaryinthedesert")

3 1/3 cups very finely ground almonds ( or other nut you'd like)( Also I toasted mine before grinding to bring out more flavor)
3 1/3 cups unsifted cake flour
1 tsp. baking powder
2 tsp. cinnamon
1/2 tsp. nutmeg ( freshly ground is best)
1 1/2 cups unsalted butter-softened
1 cup sugar
1 egg
1 egg yolk
1 tsp. lemon zest
1/2 tsp. vanilla
Raspberry jam or Nutella (or another flavor you'd prefer)
Confectioners' sugar for dusting
*********************************
1. In a medium bowl, whisk together flour, baking powder, cinnamon and nutmeg. Set aside.
2. In a mixer bowl, cream the butter and sugar til light and fluffy.
3. Place the egg, yolk, zest and vanilla in a small bowl, then add to the creamed mixture and beat well.
4. Blend in the ground nuts.
5. Add the flour mixture, one cup at a time beating til just combined. (Scrape the bowl on the sides and bottom from time to time to be sure to get all the dough incorporated.)
6. Divide the dough into 2 pieces and place on plastic wrap. Roll each between 2 pieces of wrap to 1/8" to 1/4" thickness. Chill dough for 1 to 2 hours. Or wrap well to bake at a later time.
7. Preheat oven to 350 and cut out shapes from the cold dough, placing cookies on baking sheets back in fridge if they get too soft or your oven's not up to temp. yet.
8. Bake approx. 12 minutes, or til edges are golden.
9. Once the cookies have cooled completely, spread a teaspoonful ( depending on the size of your cookie) of filling onto the bottom cookie. Then layer with the other cookie and fill a little bit of filling into the center space. Sprinkle with confectioners' sugar.
I'd store these cookies in a tin or in the fridge, covered well or in a zip lock bag.


Wednesday, August 11, 2010

Coconut Lime Sandwich Cookies

I think all this hot weather has inticed me to look for more refreshing cooling recipes and the combo of coconut and lime just sounded so good.
The recipe for the coconut part of this sandwich cookie comes from an older issue of Martha Stewart's "Living" magazine. She actually pairs the cookie with passion fruit curd but, being fresh out of passion fruit ( ha! ), I made instead a lime filling and it worked out great!

I made two changes to Martha's recipe which was to add a little coconut extract to up the coconut flavor and the other was to use sweetened coconut because this was what I had. And I made my cookies bigger than the original recipe ( 2" in size) and I only got 2 dozen total cookies. Martha's says it will make 3 dozen sandwiches! I take that to mean 6 dozen cookies made into 3 dozen sandwich cookies. I really don't know if you can actually get that many..but maybe. Her cutters were 1 1/4" in size.


Whisk the flour, baking powder and salt in a medium bowl and set aside.
Put the butter and granulated sugar into a mixer bowl and beat til pale and fluffy.
Mix in the egg and vanilla.
Reduce speed to low and gradually add the flour mixture.


Stir in the coconut.
Then shape the dough into 2 discs and wrap each in plastic.
Place into the fridge til cold, about 30 minutes.
Note: I actually took the discs out of the fridge after 30 minutes and rolled out to 1/4" thickness between 2 sheets of plastic, then I popped them into the freezer for about 20 minutes to harden, then I cut out the shapes. Then I popped them back into the freezer for another few minutes to firm up, then baked them.


Once they baked, they lost their pretty flower shape so I would suggest just using a round cookie cutter.


Make the filling by beating all the ingredients together in a small bowl, then place about a tablespoonful onto one cookie and top with another to make the sandwich.
Store the cookies in the fridge since the filling will soften in the warm room temperatures.
Coconut Lime Sandwich Cookies ( adapted from Martha Stewart)
Makes 12 or more sandwich cookies, depending on the size of your cookie cutter. I used 2" cutters and the original recipe calls for using 1 1/4" cutters.
Cookies:

1/2 cup AP flour
1/2 tsp. baking powder
1/8 tsp. salt
1/4 cup ( 1/2 stick) unsalted butter
1/3 cup granulated sugar
1 large egg
1/2 tsp. vanilla
1/4 tsp. coconut extraxt ( optional but I think it's needed)
3 1/2 ozs. unsweetened flake coconut ( about 1 1/2 cups) ( I used sweetened)
Confectioner's sugar, for dusting
Filling:
1 cup confectioner's sugar
2 tbsp. butter, softened
2 tsp. lime zest
1 tbsp. lime juice
Cookies:
1. Whisk flour, baking powder and salt in a medium bowl.
2. Put butter and granulated sugar into a mixer bowl and beat in medium high speed til pale and fluffy, about 2 minutes.
3. Mix in the egg and vanilla.
4. Reduce speed to low and gradually mix in the flour mixture.
5. Stir in the coconut.
6. Shape dough into 2 discs and wrap each in plastic. Refridgerate til cold, about 30 minutes.
7. Preheat oven to 375 and get a parchment lined baking sheet ready.
8. Take the discs out of the fridge and roll each out to 1/4" thickness, then pop them into the freezer for about 20 minutes. Then take them out of the freezer and cut out your shapes and pop them back into the freezer for another few minutes to firm up.
9. Place them onto your parchment lined baking sheet and bake 8 to 10 minutes, or til the edges are golden. ( Mine took the full 10 minutes.).
10. Cool completely on sheets on wire racks.
11. Fill cookies when cooled. Dust with confectioner's sugar before serving.
Filling:
Mix all the ingredients in a small bowl and place about one tablespoonful onto one cookie and top with another.
Store cookies in the fridge in an airtight container.


Monday, May 31, 2010

Praline Ice Cream Sandwiches

It's always challenging to try to photograph ice cream in 80 degree weather! Almost as challenging as eating ice cream in 80 degree weather. You have to do both very quickly!
But this recipe sounded so delicious that I just had to give it a try. It's from the June 2006 issue of Gourmet Magazine and it's my June submission to Gourmet Unbound.
With summer fast approaching, ice cream is one of those cool refreshing treats that everyone loves and these praline ice cream sandwiches are the best!
Every reviewer loved this recipe. It's kind of a grown up version of the kid's treat. The praline adds not only a perfect crunch but a wonderful rich buttery flavor. Using a good quality vanilla ice cream allows the sandwich to take center stage and not be overpowered by the ice cream flavor. I did halve the recipe because it would be dangerous to have too many of these in the house..I'm sure you know what I mean!

It is not at all difficult to make but there are several steps you need to do.
I would suggest, once you've assembled the sandwiches with the ice cream, to wrap and freeze them but once frozen, I would cut them into individual sandwiches and rewrap. This way, you can just reach into the freezer and grab one without having to cut them apart each time. Just a suggestion!

The first step is to make the praline. Place the pecans into a small bowl with the salt and stir.
Place a sheet of foil onto your work surface.
Cook the sugar in a skillet, undisturbed, til it begins to melt.
Continue to cook on moderate heat, stirring occasionally, til sugar melts and the mixture takes on a nice caramel color.

Dump in your pecan/salt mixture and stir to coat pecans.


Then spread the mixture out onto your foil. and let it cool completely. You need to work fast as the mixture will harden up as it cools. (If any has stuck to the pan too much just put the pan back over the heat to soften it enough to scoop out.)


To make the sandwich layer, whisk the dry ingredients and set aside.
Place the brown sugar and butter in a medium bowl and using an electric beater, beat 3 minutes, or til pale and fluffy.


Add the eggs beating well after each addition. Beat in the vanilla.
Add in the dry ingredients in 2 batches.
Spread the batter into your prepared pan.

Sprinkle the chopped pralines over top and bake for 10 minutes.


Or til it gets a nice golden color.
Let it cool.

Once you've allowed time to let it cool, spread a layer of softened vanilla ice cream onto half the layer, then top with the other half to make a sandwich. Wrap in plastic and place into freezer an hour.


Praline Ice Cream Sandwiches ( from Gourmet Magazine June 2006 issue)

Makes 24 sandwiches

Praline:
1 cup pecans, coarsely chopped
1 1/2 tsp. salt ( I used 1 tsp.)
1 cup granulated sugar
Sandwich layer:

1 1/2 sticks unsalted butter, room temp. Plus a little more for greasing the pan.
1 1/2 cups AP flour
1 tsp. baking powder
1/4 tsp. baking soda
1/4 tsp. salt
1 1/4 cups dark brown sugar
2 large eggs
1 tsp. vanilla
Filling:

2 pints of store bought vanilla ice cream
To make praline:
1. Stir pecans and salt in a small bowl. Set aside.
2. Put a sheet of foil on a work surface.
3. Cook sugar in a heavy 10" skillet over moderate heat, undisturbed, til it begins to melt.
4. Continue to cook, stirring occasionally, til sugar melts into a golden caramel.
5. Add salted pecans, stirring til coated well.
6. Spread onto the foil . Let it cool completely, about 15 minutes.
7. Peel praline off foil and chop praline coarsely ( some reviewers suggested the fine chop Gourmet recommended was too fine).
Sandwich layer:
Preheat oven to 375. Draw a large X with butter onto 2 baking pans, 15 1/2" x 10 1/2" x 3/4" deep each. (Basically a jelly roll pan) Press parchment paper onto butter X to hold in place. Leave a 1" overhang on outer side edges.
1. Whisk flour, baking powder, baking soda and salt in a small bowl. Set aside.
2. Beat butter and brown sugar in another bowl with electric mixer at medium speed til pale and fluffy, about 3 minutes.
3. Add eggs, one at a time, beating well after each addition.
4. Beat in the vanilla.
5. Reduce speed to low and add flour mixture in 2 batches. Mix til just incorporated.
6. Divide batter between 2 pans, ( if using full recipe), spread a thin layer, using an offset spatula.
7. Sprinkle chopped praline over top.
8. Bake, switching pans halfway through the baking, til golden but still tender, about 10 minutes.
9. Cool in pans 10 minutes, then transfer with the parchment paper to wire rack to cool completely, about 30 minutes.
Line a clean pan with fresh parchment, leaving a 1" overhang, and invert sandwich layers onto work surface and carefully peel off and discard parchment. ( Ok, I have a hard time throwing away perfectly good, barely used parchment paper! I just turned over the parchment paper I used to bake the sandwiches on. I did halve the recipe, however, so this may not be as easy with the full amount.)
To assemble:
Transfer one layer of the sandwich, praline side down and spread the ice cream over top. Then place the other layer on top of this to make a sandwich. (They suggest you trim the edges, to make it nice and neat, I suppose, but I didn't think this step was necessary.)Gently press and wrap in plastic and freeze for at least one hour. * See my notes above about making individual servings*.

Thursday, May 20, 2010

Punishment Cookies.. aka..Les Punitions

I feel a little guilty tonight because I'm kind of cheating by linking the recipe for these wonderful French cookies to one who is an authority on French baking, for sure! Who better to explain the recipe than Dorie Greenspan. Take a moment to view the video of the late Lionel Poilane making these amazing cookies. He must have been truly a master and it's so heartbreaking to read that his life was cut short.
I used the best quality butter I could, which is the same butter I use in my shortbread cookies. When your recipe calls for only a few ingredients, you'd better use the best! I'm sure French butter is very different from ours and Dorie does talk about the different butters and the ones she likes.
And, of course, as you can see from the photo, I made them into sandwich cookies, using a raspberry filling I found on Martha Stewart's site ( Once again, linking the recipe!).


Making these cookies was very similar to making the shortbread. They go together easily, then you chill the dough, roll them out and chill the dough again.

I put them onto parchment paper to bake but you could also try just sprinkling some granulated sugar onto the baking sheet without the parchment. I think because of all the butter,it shouldn't stick. Just remember to take your metal spatula and loosen them just after they come out of the oven because if they cool too long on the sheet they may be very difficult to remove in one piece.


I wound up really loving the thinner ones, the ones that were rolled out to 1/8" thickness. They were crunchier and I love the crunch! Dorie said to bake til still pale but I like them baked til they have a slight light brown color on the edges. Now, maybe that's not the correct French way to do it but, it's just my preference.


Other fillings, if you chose to make sandwich cookies, could be chocolate ganache, the mint or coffee filling Martha has recipes for, or how about a nice citrus filling like lemon or orange?
So go ahead and try them. They are a wonderful lightly sweet little cookie.


Tuesday, February 23, 2010

Chai Shortbread Cookies

I have the very good fortune to be set up on the weekend indoor Farmers Market in Stockton, NJ next to the fabulous Owowcow Creamery , selling some of the best..no..make that the best ice cream I have ever tasted. Their ice cream is made in small batches from local, all natural ingredients and the owner, John makes it all himself. The flavors are just amazing and I get to sample everything! They even pass out the almost empty containers for us all to polish off!
Well, last weekend, John made a Chai Cream flavor ice cream that he gave me to sample. It is my new favorite flavor, so far with the Pistachio Raspberry running a close second! But this Chai flavor inspired me to seek out a Chai Shortbread Cookie and I found this recipe on the Culinaryinthedesert blog which is from a Land O Lakes recipe, so he states.
I made half the recipe, to be sure the cookie wouldn't come out too hard for a sandwich cookie. I find that if a cookie that's made to take a filling is too hard, once you bite into it all the filling gushes out. Well, this cookie was just right. Using only confectioners sugar, it is soft enough to take the filling but not too soft for a shortbread.
The flavors of the chai really came through and the filling adds a kind of creaminess to the cookie. I think I'll try adding a little star anise to the next batch since it's another one of the ingredients in chai and not listed in this recipe. Now that I have this recipe, I'm going to adapt my toasted coconut shortbread recipe and then I can incorporate a lime filling..Yum! Stay tuned!
Chai Shortbread Sandwich Cookie ( adapted from Culinaryinthedesert)
Cookie:
2 cups AP flour
1/2 tsp. + 1/8 tsp. salt
3/4 tsp. cardamom
1/2 tsp. cinnamon
1/8 tsp. cloves
Scant 1/8 tsp. freshly ground black pepper
2 sticks unsalted butter, softened
3/4 cup confectioners sugar
Filling:
2 tbsp. half & half
1/4 - 1/2 tsp. instant espresso powder
2 cups confectioners sugar
4 tbsp. unsalted butter, softened
1/4 tsp. cardamom
1/4 tsp. cinnamon
1/8 tsp. ginger
Topping:
2 tbsp. confectioners sugar
1/2 tsp. unsweetened cocoa
Preheat oven to 325. ( I bake mine in a 350 oven and it was fine). Generously sprinkle granulated sugar on baking sheets.
1. In a medium bowl, whisk flour, salt and spices.
2. In a large bowl, beat butter and sugar til light and fluffy.
3. Add the dry ingredients and mix til all is combined well and begins to clean the sides of the bowl.
4. Shape dough into 1" to 1 1/2" balls and place on baking sheets. Flatten each one with a flat bottom glass dipped in sugar to 1 3/4" in diameter.
5. Bake 10 to 14 minutes. Cool completely on wire rack.
6. Filling: Stir half & half and espresso powder together in a small mixing bowl. Beat in confectioners sugar, a little at a time, then beat in butter and spices. Beat til smooth and creamy.
7. Add a teaspoon size dollop of filling onto one cookie and top with another.
8. Topping: In a small bowl, stir confectioners sugar and cocoa together. Sift over sandwiched cookies.

Thursday, February 18, 2010

Lemon Whoopie Pies

The cold weather and snow still everywhere in sight makes me want to bake some lemon and lime flavors, with a little coconut thrown in! Maybe I can't be surrounded by warm ocean breezes and gently swaying palm trees but I can sure make some flavors of the tropics! And you know I have plenty of lemons hanging around.
I actually made 3 different recipes using coconut, lime and lemon.
The first was a toasted coconut shortbread cookie, using my basic shortbread cookie recipe, I just added some toasted coconut and a little coconut extract. It turned out great and I'll post the photos and recipe in a day or 2.
The second recipe, from The King Arthur Flour Cookie Companion, is Key Lime Bars in Coconut Crust. This one ..tomorrow!
Today, Lemon Whoopie Pies. I've made pumpkin, chocolate and even zucchini whoopie pies before and I was looking for some different flavors for the cookie when I came upon this recipe. And still having my seemingly endless supply of lemons ( I think they're multiplying in the fridge!), I chose these light, delicate, lemony, ethereal ( don't you love that word!)whoopie pies and found another recipe for the lemon filling.
So, if you live in a cold climate..or not, these lemon whoopie pies will definitely brighten your day!

Begin by sifting the dry ingredients into a medium bowl.


In a large bowl, beat the butter, sugar and lemon zest til smooth.
Add the egg, lemon juice and vanilla.
Add the flour and buttermilk alternately.
I wanted my cookies on the smaller side so I used a small cookie scoop.

If you want larger cookies, just use heaping tablespoonfuls.
Place them 3" apart on the baking sheet.

They don't get high and fat like the chocolate whoopie pies. These are delicate and airy.
Let them cool completely before putting the filling on top to make a sandwich.

Lemon Whoopie Pies ( adapted from recipe from joythebaker, who got it from the Big Fat Cookie Book) Makes 8 giant cookies or about 15 smaller cookies.
Cookie:
Preheat oven to 350. Line 2 baking sheets with parchment paper.

1 1/2 cups AP flour
1/2 tsp. baking powder
1/4 tsp. baking soda
1/4 tsp. salt
6 tbsp. unsalted butter, room temp.
1 cup sugar
1 tsp. finely grated lemon zest
1 large egg
1 tbsp. fresh lemon juice
1 tsp. vanilla
1/2 cup buttermilk
Filling:
1/2 cup butter, softened
1/4 cup lemon juice
2 - 3 cups confectioners sugar
zest of one lemon
1. Sift flour, baking powder, baking soda and salt in medium bowl and set aside.
2. In a large bowl, using an electric mixer, beat on medium speed the butter, sugar and lemon zest til smooth, about 3 minutes. Scrape sides of bowl occasionally with spatula.
3. Add egg, lemon juice and vanilla, mixing til blended, about 1 minute.( Batter may look curdled).
4. On low speed, add half the flour mixture , mixing just to incorporate it. Mix in the buttermilk. Mix in remaining flour mixture just til it is incorporated and the batter looks smooth again.
5. Drop heaping tablespoonfuls onto prepared sheets placing 3" apart. For smaller cookies, use heaping teaspoonfuls or a small cookie scoop.
6. Bake one sheet at a time, about 12 minutes, checking after 10 minutes. The cookies will be slightly browned along the edges but not on top.
7. Remove from oven and let them cool on the baking sheet 10 minutes, then using a wide, thin spatula, transfer them to a wire rack to cool completely.
Filling:
1. Place the softened butter in a medium bowl and beat til smooth.
2. Add the confectioners sugar, starting with 2 cups, and beat til smooth.
3. Add the lemon juice and zest, adding more confectioners sugar or juice as you stir to get the correct consistency for a nice, smooth but not too thin filling.
Spread filling onto one cookie and top with another.
Wrap each one in plastic wrap and refridgerate. Keep them in fridge or in a cool place. Will keep up to 4 days in fridge.( Ha! Like thy'll last that long!)


Tuesday, January 19, 2010

Spoon Cookies

The first of this month I submitted a cookie recipe to Gourmet Unbound, a site dedicated to cooking and choosing recipes from Gourmet magazines past issues.
Had I been aware of this site in December I probably would have chosen this Spoon Cookie recipe to submit. It's from a December 2005 issue of Gourmet.
I was curious about the name and found myself looking it up just to see why it is called this. Turns out it's named this because you fill a spoon with the dough, press the dough down into the spoon and then slide out the formed dough. Well, ok..and here I thought, what? That it was made out of spoons? Kidding!
But this cookie is a bit tricky. The most time consuming part of making this spoon cookie is browning the butter. If you've never done this before, take a look at this for a quick lesson. Or my photos, of course!
These cookies are quite crumbly and delicate, but they are light and delicious.

Just so you know, I halved the recipe. I figured just in case I botched the browning part, I would only be wasting one stick of butter.
So start by browning the butter. To do this, melt the butter in a saucepan( I cheated and used a saute type of pan), over moderate heat.
As the butter melts, it forms white foam on top.


Tiny bubbles begin to form as the heat increases and the white foam starts to break up a little.
After about 5 to 7 minutes the butter turns this nice golden color.
Stir more at this point and once tiny specks appear on the bottom and the color is a nutty brown shade, take the pan off the heat and place into your sink filled with cold water. Oh, didn't I mention that? Yes, before you start the browning process, first fill your sink with about 2 inches of cold water.
Placing the pan in the sink with cold water stops the cooking.
Stir the butter. It will start to look opaque after a few minutes.
Remove the pan from the sink and pour in the sugar and vanilla.

Stir to combine the sugar and vanilla with the butter.

Whisk flour, salt and soda in a small bowl and stir into the butter mixture til a dough forms.

It will seem crumbly but it does come together.

Shape the dough into a ball and wrap in plastic.
Let it sit at room temp. for 1 to 2 hours for the flavor to develop.
Preheat your oven to 325 and place your rack in the middle of the oven.
The recipe originally said to scoop using a teaspoon. I thought this size was way too small so I used..
I used a half tablespoon spoon, measuring spoon that is. The particular measuring spoon I have has a nice shallow "bowl" and it's easy to slide the dough out. BTW, doesn't the dough in that photo above look kind of creepy?!
Anyway, press the dough into the spoon, then slide it out carefully. It may want to crumble so if it does, just press it back in there and try again.
They don't spread at all when baked.

Let them cool 5 minutes on the cookie sheet, then transfer to a wire rack to cool completely.
In the meantime, heat the fruit preserves you'll be using. I used black raspberry.
Then go ahead and place some preserves onto the flat side of one cookie and top with another cookie to make a sandwich. Allow the filling to set.
There is a note about the cookies that says they get much better after a few days. I'll have to hide them to find out if that's true since they're almost all gone already!
Spoon Cookies (from Gourmet Magazine Dec. 2005)
2 sticks of cold, unsalted butter, cut into pieces.
3/4 cup sugar
2 tsp. vanilla
2 cups AP flour
1 tsp. soda
1/8 tsp. salt, slightly rounded
1/3 cup fruit preserves
Dough:
Fill your kitchen sink with 2" of cold water
1. Melt butter in a 2 - 3 quart heavy saucepan,( I used a shallow saute type pan.) over moderate heat, and cook, stirring occasionally, til butter turns golden with a nut like fragrance and flecks on the bottom of the pan turn a rich caramel brown color, about 10 - 12 minutes.
Butter will initially foam, them dissapate. A thicker foam will appear and cover the surface just
before butter begins to brown.
Stir more frequently toward the end of cooking.
2. Place pan in sink of water, to stop the cooking and cool it down. Stir frequently til butter starts to look opaque, about 4 minutes.
3. Remove pan from sink and stir in sugar and vanilla.
4. In a small bowl, whisk flour, soda and salt. Stir into butter mixture til a dough forms.
5. Shape dough into a ball and wrap in plastic. Let it sit out at room temp. for 1 to 2 hours for the flavor to develop.
6. Preheat oven to 325 and place rack in middle of oven.
7. Place a piece of dough into "bowl" of teaspoon ( I used my half tablespoon measuring spoon.)
Flatten out the top. Slide the dough out of the spoon and onto an ungreased cookie sheet with flat side down. ( Dough will feel crumbly).
8. Bake til pale golden. I found it took almost 15 - 18 minutes to bake.
Cool on sheet 5 minutes then transfer to wire rack to cool completely.
9. Heat fruit preserves in a small saucepan over low heat til just runny.
Pour through sieve, if needed, cool.
10. Spread cookie with preserves and top with another cookie. Let set 45 minutes.
* Cookies get much better after a few days*.
Cookies will keep in an air tight container for up to 2 weeks.
Makes about 30 sandwich cookies ( teaspoon size).


LinkWithin

Related Posts with Thumbnails