Sorry...a little late for Valentine's Day! But it doesn't have to be a special day for anything chocolate. Right?
I made these for that certain day so I thought I'd share the recipe with you. These cupcakes are chocolatey and so delicious and with the espresso...yum! I threw in a handful of mini chocolate chips, rather than the regular sized chips and I actually liked the smaller size better.
The frosting is made with sour cream, which I think helps cut down that overly sweet frosting taste.
The recipe is pretty straightforward to make and, as my usual way, I baked them jumbo size! Sometimes you just want a good sized cupcake and it's really even a little less than a slice of cake, too!
First you need to melt the chocolate over gently simmering water.
Once the chocolate has melted, set it aside to cooled slightly.
Next beat the butter and gradually beat in the sugar, followed by the eggs, vanilla and melted chocolate.
Add in the flour in stages, alternating with the espresso mixed with water.
Place the batter into your paper liners and bake 20 to 22 minutes.
Mocha Chocolate Chip Cupcakes with Chocolate Sour Cream Frosting ( from "Fine Cooking" magazine)
Makes 12 regular ( standard) size or 6 jumbo cupcakes
3 ozs. unsweetened chocolate, chopped
1 cup (4.5 ozs.) unbleached AP flour
1/2 tsp. baking soda
1/4 tsp. table salt
1/2 cup (4 ozs. or 1 stick) unsalted butter, room temp.
1 cup granulated sugar
2 large eggs
1 1/2 tsp. vanilla extract
2 tsp. instant espresso powder, dissolved in 1/2 cup cool water
2/3 cup semisweet chocolate chips (I used mini chips)
Frosting:
2 ozs. unsweetened chocolate, chopped
1 tbsp. unsalted butter
1/3 cup sour cream (not low-fat)
3/4 tsp. vanilla extract
Pinch salt
1 1/2 cups (6 ozs.) confectioners' sugar
Milk, if necessary
**********************************
Preheat oven to 350. Line muffin cups with paper liners.
1. Put the unsweetened chocolate into a bowl set over gently simmering water and stir occasionally til melted. Set aside to cool.
2. In a small bowl, whisk the flour, baking soda and salt.
3. In a mixing bowl, beat the butter 30 to 60 seconds or til smooth. With mixer running, gradually pour in the sugar, scraping the sides and bottom of the bowl a few times. Then beat in medium high til light and fluffy, 2 to 3 minutes.
4. Beat in the eggs, one at a time, beating well after each addition, scraping the bowl after each addition.
5. Beat in the vanilla and melted chocolate til smooth and blended.
6. On low speed, add the dry ingredients in 3 installments, alternating with the espresso in 2 additions.
7. Stir in the chocolate chips by hand.
8. Divide the batter evenly among the prepared muffin cups. Don't smooth the batter.
9. Bake the cupcakes til they spring back when gently pressed in the center, 20 to 22 minutes.( a little longer if making jumbo cupcakes). Let them cool 5 minutes in the pan, then remove and cool on a wire rack before frosting.
Frosting:
1. Put the chocolate and butter in a bowl over gently simmering water and stir til melted and smooth. Set aside to cool til barely warm.
2. In a medium bowl, whisk together sour cream, vanilla and salt.Gradually whisk in the confectioners' sugar til smooth.
3. Add the chocolate/butter mixture and beat it in with the whisk til smooth and creamy.
The frosting must be thick and spreadable. If too thick, thin it with a few droplets of milk. If too thin, chill it briefly, stirring occasionally, til adequately thickened.
Thursday, February 16, 2012
Wednesday, January 25, 2012
Banana Cupcakes with Cream Cheese Frosting
Banana cake...you either love it or not! One of my kids wouldn't touch this cupcake, and the other loved it. I have to admit, there was a time when I didn't really care for banana anything. Just give me a straight banana, please, with a side of peanut butter! But, alas, all things change in time and I, too, have become a banana convert.
This simple old fashioned recipe was found in one of our local Bucks County magazines recently. It was a family recipe and I was taken by how quickly and easily it went together. Basically you just throw everything into the mixing bowl and beat it together til it's combined...how easy is that? ( Wait...I stole that line from..?!)
The original recipe was to make a two layer cake but I made a few changes. I chose to halve the recipe and make 6 jumbo cupcakes. I can see that it would make a great cake, though. And, to the frosting I added a little cinnamon to give it a tiny boost of flavor. One last addition, which I didn't use but would next time, would be to include some nuts. I think walnuts would be a welcome addition and give it that ever lovin' crunch that I'm always craving! But that's just me. You may not love walnuts and want to leave them out. That's up to you. That's the fun part about baking. Throw in what you love...leave out what you don't!
Place the dry ingredients into your mxing bowl and add the butter, buttermilk, mashed banana and vanilla and beat for 2 minutes.
Add the eggs and beat another 2 minutes, scraping down the bottom and sides of the bowl once or twice to be sure everything is well combined. If you're adding nuts, just stir them in now.
That's it!
Scoop the batter into cupcake liners, filling them equally.
Bake approx. 20 minutes or til tester comes out clean.
Let them cool completely before frosting.
Make the frosting by just combining the ingredients in a small bowl and beating til it's all combined.
Banana Cupcakes with Cream Cheese Frosting
Makes 6 jumbo cupcakes or 12 regular size cupcakes
Note: To make this recipe for a two layer cake, double all of the ingredients below and pour the batter into 2 grease and floured 9" cake pans. Your baking times will be longer
1 1/4 cups ( 5.7 ozs.) AP flour
3/4 cups sugar
generous 1/2 tsp. baking powder
generous 1/2 tsp baking soda
1/2 tsp salt
1/3 cup ( 5 tbsp. plus 1 tsp.) softened butter
1/3 cup buttermilk
1/2 tsp. vanilla
3/4 cup mashed bananas ( approx. 1 1/2 bananas)
1 large egg
Frosting, see below
************************
Line a cupcake pan with paper liners and set aside.
Preheat oven to 350.
1. Place the flour, sugar, baking powder, baking soda and salt into a mixing bowl. Make sure it's all mixed thoroughly, then add the butter, buttermilk, vanilla and mashed bananas and mix on low to start out to combine, then increase speed to medium high and beat for 2 minutes.
2. Add the egg and continue to beat for an additional 2 minutes.
3. Scoop the batter into your prepared muffin liners.
4. Bake for approx. 20 minutes, testing with a toothpick for doneness.
5. Cool a few minutes in the pan, then remove the cupcakes from the pan and cool on a wire rack completely before frosting.
Frosting:
4 ozs. cream cheese, room temp.
3 tbsp. softened butter
1 1/2 cups confectioners' sugar
1/2 tsp. vanilla
1 1/2 tsp. lemon juice
dash of cinnamon ( approx. 1/4 tsp.)
In a small mixing bowl, beat the cream cheese and butter til smooth. Beat in the vanilla and lemon juice, then beat in the confectioners' sugar til it's a nice smooth consistency, adding more sugar if too thin. Decorate and enjoy!
This simple old fashioned recipe was found in one of our local Bucks County magazines recently. It was a family recipe and I was taken by how quickly and easily it went together. Basically you just throw everything into the mixing bowl and beat it together til it's combined...how easy is that? ( Wait...I stole that line from..?!)
The original recipe was to make a two layer cake but I made a few changes. I chose to halve the recipe and make 6 jumbo cupcakes. I can see that it would make a great cake, though. And, to the frosting I added a little cinnamon to give it a tiny boost of flavor. One last addition, which I didn't use but would next time, would be to include some nuts. I think walnuts would be a welcome addition and give it that ever lovin' crunch that I'm always craving! But that's just me. You may not love walnuts and want to leave them out. That's up to you. That's the fun part about baking. Throw in what you love...leave out what you don't!
Place the dry ingredients into your mxing bowl and add the butter, buttermilk, mashed banana and vanilla and beat for 2 minutes.
Add the eggs and beat another 2 minutes, scraping down the bottom and sides of the bowl once or twice to be sure everything is well combined. If you're adding nuts, just stir them in now.
That's it!
Scoop the batter into cupcake liners, filling them equally.
Bake approx. 20 minutes or til tester comes out clean.
Let them cool completely before frosting.
Make the frosting by just combining the ingredients in a small bowl and beating til it's all combined.
Banana Cupcakes with Cream Cheese Frosting
Makes 6 jumbo cupcakes or 12 regular size cupcakes
Note: To make this recipe for a two layer cake, double all of the ingredients below and pour the batter into 2 grease and floured 9" cake pans. Your baking times will be longer
1 1/4 cups ( 5.7 ozs.) AP flour
3/4 cups sugar
generous 1/2 tsp. baking powder
generous 1/2 tsp baking soda
1/2 tsp salt
1/3 cup ( 5 tbsp. plus 1 tsp.) softened butter
1/3 cup buttermilk
1/2 tsp. vanilla
3/4 cup mashed bananas ( approx. 1 1/2 bananas)
1 large egg
Frosting, see below
************************
Line a cupcake pan with paper liners and set aside.
Preheat oven to 350.
1. Place the flour, sugar, baking powder, baking soda and salt into a mixing bowl. Make sure it's all mixed thoroughly, then add the butter, buttermilk, vanilla and mashed bananas and mix on low to start out to combine, then increase speed to medium high and beat for 2 minutes.
2. Add the egg and continue to beat for an additional 2 minutes.
3. Scoop the batter into your prepared muffin liners.
4. Bake for approx. 20 minutes, testing with a toothpick for doneness.
5. Cool a few minutes in the pan, then remove the cupcakes from the pan and cool on a wire rack completely before frosting.
Frosting:
4 ozs. cream cheese, room temp.
3 tbsp. softened butter
1 1/2 cups confectioners' sugar
1/2 tsp. vanilla
1 1/2 tsp. lemon juice
dash of cinnamon ( approx. 1/4 tsp.)
In a small mixing bowl, beat the cream cheese and butter til smooth. Beat in the vanilla and lemon juice, then beat in the confectioners' sugar til it's a nice smooth consistency, adding more sugar if too thin. Decorate and enjoy!
Sunday, January 22, 2012
Dense Fudgy Brownies
In my world, there's always room for one more brownie recipe, especially a dense and fudgy one and this one is the fudgiest ever!
These are appropriately named "Luxury Brownies" and they are so luxurious, using the best dark chocolate you have, along with a good quality cocoa powder...how can you beat that? The original recipe calls for your choice of nuts, either one kind or an assortment but instead of nuts, Iused threw in a handful of Ghirarrdelli bittersweet chocolate chips, since no one in my family likes nuts in their brownies except me...and goodness knows I don't dare make them just the way I alone like them! That would be dangerous!
Just remember to cut very tiny squares for serving. They're that rich.
Luxury Brownies ( adapted from here)
7.1 oz. unsalted butter
1 1/2 cups sugar
4 eggs, room temp. and whisked
8.1 ozs. dark chocolate ( good quality), chopped into very small pieces.
4.9 ozs. AP flour
Scant 1/2 cup (1.4 ozs.) cocoa powder ( good quality, like Valhrona)
Pinch salt
Approx. 7 ozs. nuts of your choice (technically this comes to roughly 2 cups, depending on which nuts you choose, but I think one cup is more than enough)
You can use a combination of pistachio, walnut, hazelnut, pecans or just one kind that you like.
***************************
Butter and line with foil, an 8" x 8" pan. Preheat oven to 350.
1. Sift together flour, cocoa powder and salt. Set aside.
2. In a large saucepan, melt butter completely.
3. Add the sugar and stir til the sugar is dissolved.
4. In a separate bowl, mix the chocolate pieces and eggs together, making sure it's all well mixed.
5. Pour the piping hot butter/ sugar mixture into the chocolate/eggs mixture, mixing quickly and thoroughly. If there's still some chocolate not totally melted, just put the bowl over some gently simmering water and stir til it's all melted.
6. Scoop spoonfuls of the flour/cocoa powder into the mixture, stirring with a rubber spatula just til no traces of flour can be seen.
7. Gently stir in the nuts (leave some out to decorate the top, if you want it to look pretty!) or add the chocolate chips, if going that route.
8.Pour the batter into your prepared pan and decorated the top with your nuts, if using.
9. Bake 18 to 22 minutes.
The brownies are cooked when the edges are slightly dry, the top is shiny and has cracked. The center of the brownie should not be wobbly when shaken. Important! The toothpick method of testing does not work on this fudgy brownie!
Let the brownies cool completely before cutting...or better yet, wait til the next day to cut. These brownies get better with each passing day! Remember to cut very small squares...they're that rich. Enjoy! And please, if you make them, let me know what you think, which nuts you prefer...or if you used my handful of chocolate chips adaptation.
These are appropriately named "Luxury Brownies" and they are so luxurious, using the best dark chocolate you have, along with a good quality cocoa powder...how can you beat that? The original recipe calls for your choice of nuts, either one kind or an assortment but instead of nuts, I
Just remember to cut very tiny squares for serving. They're that rich.
Luxury Brownies ( adapted from here)
7.1 oz. unsalted butter
1 1/2 cups sugar
4 eggs, room temp. and whisked
8.1 ozs. dark chocolate ( good quality), chopped into very small pieces.
4.9 ozs. AP flour
Scant 1/2 cup (1.4 ozs.) cocoa powder ( good quality, like Valhrona)
Pinch salt
Approx. 7 ozs. nuts of your choice (technically this comes to roughly 2 cups, depending on which nuts you choose, but I think one cup is more than enough)
You can use a combination of pistachio, walnut, hazelnut, pecans or just one kind that you like.
***************************
Butter and line with foil, an 8" x 8" pan. Preheat oven to 350.
1. Sift together flour, cocoa powder and salt. Set aside.
2. In a large saucepan, melt butter completely.
3. Add the sugar and stir til the sugar is dissolved.
4. In a separate bowl, mix the chocolate pieces and eggs together, making sure it's all well mixed.
5. Pour the piping hot butter/ sugar mixture into the chocolate/eggs mixture, mixing quickly and thoroughly. If there's still some chocolate not totally melted, just put the bowl over some gently simmering water and stir til it's all melted.
6. Scoop spoonfuls of the flour/cocoa powder into the mixture, stirring with a rubber spatula just til no traces of flour can be seen.
7. Gently stir in the nuts (leave some out to decorate the top, if you want it to look pretty!) or add the chocolate chips, if going that route.
8.Pour the batter into your prepared pan and decorated the top with your nuts, if using.
9. Bake 18 to 22 minutes.
The brownies are cooked when the edges are slightly dry, the top is shiny and has cracked. The center of the brownie should not be wobbly when shaken. Important! The toothpick method of testing does not work on this fudgy brownie!
Let the brownies cool completely before cutting...or better yet, wait til the next day to cut. These brownies get better with each passing day! Remember to cut very small squares...they're that rich. Enjoy! And please, if you make them, let me know what you think, which nuts you prefer...or if you used my handful of chocolate chips adaptation.
Saturday, December 24, 2011
Christmas Butter Cookies
Hope everyone has a wonderful Holiday!
I made these delicious buttery and so easy butter cookies that uses a cookie press. I have a vintage press, that you can actually buy in several of places these days, such as ebay, or even a flea market. I prefer these vintage ones to any newer ones made today.
But getting back to the cookies, it's only 4 ingredients, butter, sugar, flour and salt. So simple, yet so good.
Perfect for those last minute Christmas cookie for Santa tonight!
Butter Cookies ( for a cookie press)
(Note: I halved this recipe below and it made 4 1/2 dozen cookies)
1 lb. butter, unsalted at room temp.
1/2 cup sugar
1/2 tsp. salt
4 cups AP flour ( 18 ozs.)
*************************
Preheat oven to 375.
1. Beat butter and sugar til light and fluffy.
2. Beat in the salt and flour, mixing til well blended.
3. Fill the cookie press with as much dough as will fit and press each cookie onto ungreased baking sheets. Decorate with colored sprinkles.
4. Bake for approx. 10 minutes, depending on how hot your oven gets. This baking time may take a little longer or less time. The cookies should be lightly brown along the edges but not too dark.
5. Cool on wire rack, then enjoy!
Merry Christmas!
I made these delicious buttery and so easy butter cookies that uses a cookie press. I have a vintage press, that you can actually buy in several of places these days, such as ebay, or even a flea market. I prefer these vintage ones to any newer ones made today.
But getting back to the cookies, it's only 4 ingredients, butter, sugar, flour and salt. So simple, yet so good.
Perfect for those last minute Christmas cookie for Santa tonight!
Butter Cookies ( for a cookie press)
(Note: I halved this recipe below and it made 4 1/2 dozen cookies)
1 lb. butter, unsalted at room temp.
1/2 cup sugar
1/2 tsp. salt
4 cups AP flour ( 18 ozs.)
*************************
Preheat oven to 375.
1. Beat butter and sugar til light and fluffy.
2. Beat in the salt and flour, mixing til well blended.
3. Fill the cookie press with as much dough as will fit and press each cookie onto ungreased baking sheets. Decorate with colored sprinkles.
4. Bake for approx. 10 minutes, depending on how hot your oven gets. This baking time may take a little longer or less time. The cookies should be lightly brown along the edges but not too dark.
5. Cool on wire rack, then enjoy!
Merry Christmas!
Monday, November 28, 2011
Pumpkin Scones Revisited
Before I get to the pumpkin scone, I just want to say... I dropped my camera into the kitchen sink the other day and totally broke it so this photo is the best I could come up with!
I received a comment today from regarding my pumpkin scone recipe. http://thecookiescoop.blogspot.com/2011/02/pumpkin-scones-with-maple-glaze.html
Here's the comment:
I tried this recipe as I thought the combination of spices would be delicious. I'm going to go back to my recipe that used butter and sugar. The scones I made with this recipe were hard, dry and tasteless. Using sugar and butter will vastly improve the texture and flavor.
So after reading the comment from "anonymous" I decided to make the scones again this afternoon. Maybe, I thought, I got lucky the first time with this recipe and they just happened to come out great. I thought maybe they're really not as great as I thought they were. Well, guess what, They are great!
I found these scones to be light, moist and delicious, just like the first time I made them. These are cream scones so they don't have egg or butter in the recipe. They rely on the fat from the cream and the pumpkin puree to give them moistness.
There are certain steps that need to be taken when making scones.
First, all the ingredients need to be very cold. The butter, if using, needs to be cold ( or frozen) and cut into small pieces. The cream needs to be cold, even the bowl should be cold.
Second, you need to mix the wet with the dry very lightly and only til just incorporated. If you overmix the scones will come out hard.
And lastly, make sure your measurements are correct. If your cup of flour measures 5 ounces, rather than mine at 4.5 ounces, then you're using too much flour, which can change the recipe and lead to a dry hard scone.
So, anonymous, I'm sorry your pumpkin scones came out dry, hard and tasteless.
Oh and one more thing. If you don't put the glaze on top, yes, they will not be very sweet.
I received a comment today from regarding my pumpkin scone recipe. http://thecookiescoop.blogspot.com/2011/02/pumpkin-scones-with-maple-glaze.html
Here's the comment:
I tried this recipe as I thought the combination of spices would be delicious. I'm going to go back to my recipe that used butter and sugar. The scones I made with this recipe were hard, dry and tasteless. Using sugar and butter will vastly improve the texture and flavor.
So after reading the comment from "anonymous" I decided to make the scones again this afternoon. Maybe, I thought, I got lucky the first time with this recipe and they just happened to come out great. I thought maybe they're really not as great as I thought they were. Well, guess what, They are great!
I found these scones to be light, moist and delicious, just like the first time I made them. These are cream scones so they don't have egg or butter in the recipe. They rely on the fat from the cream and the pumpkin puree to give them moistness.
There are certain steps that need to be taken when making scones.
First, all the ingredients need to be very cold. The butter, if using, needs to be cold ( or frozen) and cut into small pieces. The cream needs to be cold, even the bowl should be cold.
Second, you need to mix the wet with the dry very lightly and only til just incorporated. If you overmix the scones will come out hard.
And lastly, make sure your measurements are correct. If your cup of flour measures 5 ounces, rather than mine at 4.5 ounces, then you're using too much flour, which can change the recipe and lead to a dry hard scone.
So, anonymous, I'm sorry your pumpkin scones came out dry, hard and tasteless.
Oh and one more thing. If you don't put the glaze on top, yes, they will not be very sweet.
Monday, October 31, 2011
Apple Walnut Cake
I'm plowing through those Fine Cooking magazines I received recently, trying to make at least one thing from each issue.
This snack cake is wonderfully moist, with a nice crunchy walnut topping. The original recipe was supposed to be made in a 9 x 13 pan but I knew that would be way too much for our small family so I halved it, which was way easy, and used an 8" square pan, and it turned out perfect. (The recipe I'm giving you, though, is for the full amount.)
It's an easy cake to throw together and it's great for breakfast or a late night snack!
Start by combining your dry ingredients in a medium bowl.
Beat the butter and sugar together, then add the eggs, one at a time. Add in one third of the flour mixture, then the applesauce. Add another third of the flour mixture, then the sour cream. Finish mixing in the remaining flour mixture...
Then pour the batter into your prepared pan.
While the cake bakes, make the walnut topping by combining the ingredients, then chill til needed.
Take the cake out of the oven after 15 minutes, then sprinkle on the topping and continue to bake another 30 minutes.
Apple Walnut Cake ( from "Fine Cooking" Magazine Nov. 2004)
Serves 16
2 cups ( 9 ozs.) AP flour
1 tsp. baking powder
1 tsp. baking soda
3/4 tsp. cinnamon
1/2 tsp. table salt
3 ozs. ( 6 tbsp.) unsalted butter, softened at room temp.
1 1/4 cups granulated sugar
2 large eggs, room temp.
3/4 cup smooth applesauce ( homemade or store bought)
1 cup sour cream
Walnut topping ( recipe below)
*****************************
Preheat oven to 350. Butter the bottom and sides or a 9 x 13 baking pan. Line the bottom with parchment paper and butter the parchment.
1. In a medium bowl, whisk the flour, baking powder, baking soda, cinnamon and salt. Set aside.
2. Combine butter and sugar in a large bowl and beat with an electric mixer on medium speed til combined ( but not fluffy). Scrape the bowl as needed.
3. Add the eggs, one at a time, beating to combine and scraping the bowl.
4. Add one third of the flour mixture, mixing on medium low speed til combined.
5. Add the applesauce, mixing on medium low speed til incorporated.
6. Mix in another third of the flour mixture, then the sour cream, then the remaining flour mixture, scraping the bowl. Don't overmix. Just combine til incorporated.
7. Spread batter into your prepared pan and bake 15 minutes.
8. Make the walnut topping and place in the fridge.
9. Take the cake out of the oven and sprinkle with the topping, then place the cake back in the oven for another 30 minutes, or til a toothpick comes out clean ( Mine took a little less time but it depends on your oven).
10. Cool cake on wire rack for about 20 minutes. Serve warm.
Walnut Topping:
1/2 cup ( one stick) unsalted butter
1/2 cup firmly packed light brown sugar
1/2 cup granulated sugar
1 1/4 tsp. cinnamon
1 cup ( 4.5 ozs.) AP flour
1/4 cup confectioners' sugar
4 ozs. ( 1 cup) whole walnuts, coarsely chopped
Melt the butter, then pour into a medium bowl. Add brown sugar, granulated sugar and cinnamon and stir til blended. Add the flour, confectioners' sugar and walnuts, mixing with your fingers til well combined. The mixture should be crumbly but clump together. Refridgerate til ready to use.
This snack cake is wonderfully moist, with a nice crunchy walnut topping. The original recipe was supposed to be made in a 9 x 13 pan but I knew that would be way too much for our small family so I halved it, which was way easy, and used an 8" square pan, and it turned out perfect. (The recipe I'm giving you, though, is for the full amount.)
It's an easy cake to throw together and it's great for breakfast or a late night snack!
Start by combining your dry ingredients in a medium bowl.
Beat the butter and sugar together, then add the eggs, one at a time. Add in one third of the flour mixture, then the applesauce. Add another third of the flour mixture, then the sour cream. Finish mixing in the remaining flour mixture...
Then pour the batter into your prepared pan.
While the cake bakes, make the walnut topping by combining the ingredients, then chill til needed.
Take the cake out of the oven after 15 minutes, then sprinkle on the topping and continue to bake another 30 minutes.
Apple Walnut Cake ( from "Fine Cooking" Magazine Nov. 2004)
Serves 16
2 cups ( 9 ozs.) AP flour
1 tsp. baking powder
1 tsp. baking soda
3/4 tsp. cinnamon
1/2 tsp. table salt
3 ozs. ( 6 tbsp.) unsalted butter, softened at room temp.
1 1/4 cups granulated sugar
2 large eggs, room temp.
3/4 cup smooth applesauce ( homemade or store bought)
1 cup sour cream
Walnut topping ( recipe below)
*****************************
Preheat oven to 350. Butter the bottom and sides or a 9 x 13 baking pan. Line the bottom with parchment paper and butter the parchment.
1. In a medium bowl, whisk the flour, baking powder, baking soda, cinnamon and salt. Set aside.
2. Combine butter and sugar in a large bowl and beat with an electric mixer on medium speed til combined ( but not fluffy). Scrape the bowl as needed.
3. Add the eggs, one at a time, beating to combine and scraping the bowl.
4. Add one third of the flour mixture, mixing on medium low speed til combined.
5. Add the applesauce, mixing on medium low speed til incorporated.
6. Mix in another third of the flour mixture, then the sour cream, then the remaining flour mixture, scraping the bowl. Don't overmix. Just combine til incorporated.
7. Spread batter into your prepared pan and bake 15 minutes.
8. Make the walnut topping and place in the fridge.
9. Take the cake out of the oven and sprinkle with the topping, then place the cake back in the oven for another 30 minutes, or til a toothpick comes out clean ( Mine took a little less time but it depends on your oven).
10. Cool cake on wire rack for about 20 minutes. Serve warm.
Walnut Topping:
1/2 cup ( one stick) unsalted butter
1/2 cup firmly packed light brown sugar
1/2 cup granulated sugar
1 1/4 tsp. cinnamon
1 cup ( 4.5 ozs.) AP flour
1/4 cup confectioners' sugar
4 ozs. ( 1 cup) whole walnuts, coarsely chopped
Melt the butter, then pour into a medium bowl. Add brown sugar, granulated sugar and cinnamon and stir til blended. Add the flour, confectioners' sugar and walnuts, mixing with your fingers til well combined. The mixture should be crumbly but clump together. Refridgerate til ready to use.
Monday, October 24, 2011
Cornmeal Rosemary Cake with Pine Nuts & Orange Glaze
I've been trying to figure out how to begin this post since I've been away from it for so long now. It's been well over a month and I have to admit, it feels a little odd just typing this post. It's funny how, once you stop posting for a day, then a week, then a month, you figure, well, so much time has passed, what's another day!
Truth is, I've been so busy with my baking business that I've had no extra time to make a lot of new recipes, although I did manage to make a few, which I hope to share with you in the future.
So, okay, let's get to this wonderful cake. A woman from the Farmer's Market where I sell asked me if I'd like some Fine Cooking magazines and, of course, I was happy to take them off her hands! I wasn't actually familiar with this magazine before but it really a great one, with lots of excellent recipes.
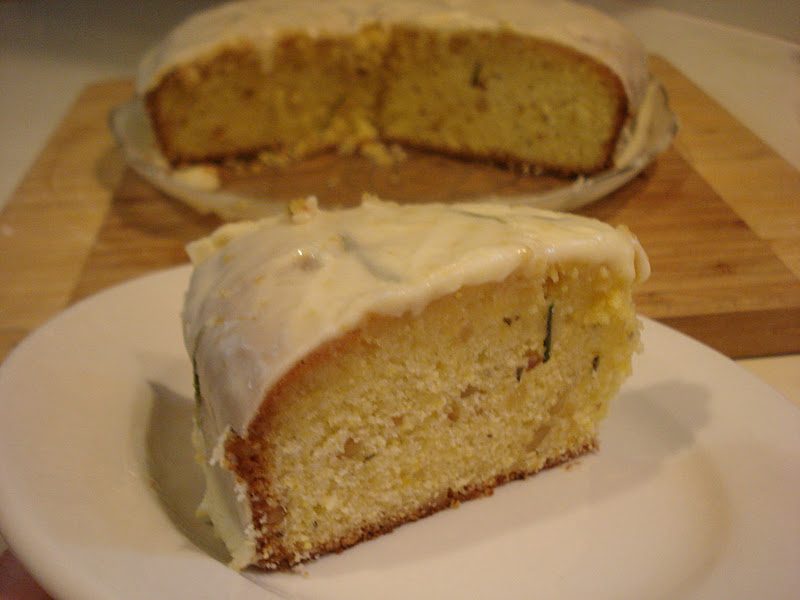
This Cornmeal Rosemary Cake has chopped pine nuts, mascarpone cheese and lots of fresh orange zest to give it a wonderful flavor, especially with the rosemary. And, it's fairly easy to make. You don't have to drag out the standing mixer, everything is mixed or whisked by hand in a few bowls.
It gets an orange syrup that you brush on top, then an orange glaze with the rosemary...so good!
Begin by combining your dry ingredients together with the orange zest.
Then whisk the mascarpone cheese and add the eggs, one at a time, then the sugar.
Fold in your dry ingredients, in 2 batches...
Then stir in the melted butter.
Pour the batter into your prepared cake pan and bake.
After you take the cake out of the oven and invert it, brush on the syrup.
Then spoon the glaze over the cooled cake and let it set up a few hours.
Cornmeal Rosemary Cake with Pine Nuts & Orange Glaze ( from "Fine Cooking" magazine, Nov. 2004)
Makes one 9" cake
Cake:
Soft butter for the pan
6 3/4 ozs. ( 1 1/2 cups) AP flour
3/4 cup finely ground yellow cornmeal ( Quaker brand is fine)
1/3 cup coarsely chopped toasted pine nuts
1 tbsp. finely chopped fresh rosemary
1 tbsp. orange zest
1 tsp. baking powder
1/4 tsp. kosher salt
5 ozs. ( 2/3 cup) mascarpone cheese, room temp.
4 large eggs
1 1/3 cups sugar
1/2 cup ( 1 stick) unsalted butter, melted
Orange Syrup:
1/2 cup fresh orange juice
3 tbsp. granulated sugar
Orange Glaze:
1 tbsp. whole fresh rosemary leaves ( stripped from the stem but not chopped)
1 1/2 cups confectioners' sugar
5 tbsp heavy cream
2 tbsp fresh orange juice
1 tsp. orange zest
******************************
Preheat oven to 350. Butter a 9" x 2" round cake pan. Line the bottom with parchment paper and butter the parchment.
1. In a medium bowl, whick together the flour, cornmeal, pine nuts, rosemary, orange zest, baking powder and salt. Set aside.
2. In a large bowl, whisk the mascarpone to loosen it a little. Add the eggs, one at a time, whisking to combine.
3. Add in the sugar and whisk til smooth.
4. Using a rubber spatula, fold the dry ingredients, in two batches, into the wet, mixing til smooth.
5. Stir in the melted butter with a rubber spatula, til well blended.
6. Spread the batter evenly into the prepared pan and bake til the entire top of the cake is a rich golden brown and springs back when pressed gently in the center, 40 to 45 minutes.
Make the orange syrup:
While the cake is almost finished baking, combine the orange juice and sugar in a small saucepan over medium heat and cook for a few minutes, stirring occasionally, til the sugar dissolves. Remove from the heat.
Once the cake has cooled about 5 minutes in the pan, invert it so it's right side up.
Poke a few dozen holes, with a skewer or toothpick, into the top of the warm cake and brush with the warm syrup. Continue brushing for several minutes, giving the syrup time to sink into the cake, til you have used all the syrup. Let the cake cool completely.
Make the orange glaze:
1. Bring a small saucepan of water to a boil. Have ready a small bowl of ice water.
2. Put the rosemary leaves into the boiling water and blanch them for a minute.
3. Scoop them out and immediately place them into the ice water. Drain them and spread them out onto a paper towel to dry.
4. In a bowl, whisk the confectioners' sugar, cream and orange juice til smooth. Then whisk in the blanched rosemary and the zest.
5. When the cake has cooled, spoon the glaze over the cake. Let it drip over the sides.
( Excess glaze will spill over so you may want to do this over a larger plate or even a baking sheet to catch the drips!).
Let the cake sit for at least an hour before cutting.
Note: This is one of those cakes that just gets better over time. Enjoy!
Truth is, I've been so busy with my baking business that I've had no extra time to make a lot of new recipes, although I did manage to make a few, which I hope to share with you in the future.
So, okay, let's get to this wonderful cake. A woman from the Farmer's Market where I sell asked me if I'd like some Fine Cooking magazines and, of course, I was happy to take them off her hands! I wasn't actually familiar with this magazine before but it really a great one, with lots of excellent recipes.
This Cornmeal Rosemary Cake has chopped pine nuts, mascarpone cheese and lots of fresh orange zest to give it a wonderful flavor, especially with the rosemary. And, it's fairly easy to make. You don't have to drag out the standing mixer, everything is mixed or whisked by hand in a few bowls.
It gets an orange syrup that you brush on top, then an orange glaze with the rosemary...so good!
Begin by combining your dry ingredients together with the orange zest.
Then whisk the mascarpone cheese and add the eggs, one at a time, then the sugar.
Fold in your dry ingredients, in 2 batches...
Then stir in the melted butter.
Pour the batter into your prepared cake pan and bake.
After you take the cake out of the oven and invert it, brush on the syrup.
While the cake is cooling, make the glaze.
Cornmeal Rosemary Cake with Pine Nuts & Orange Glaze ( from "Fine Cooking" magazine, Nov. 2004)
Makes one 9" cake
Cake:
Soft butter for the pan
6 3/4 ozs. ( 1 1/2 cups) AP flour
3/4 cup finely ground yellow cornmeal ( Quaker brand is fine)
1/3 cup coarsely chopped toasted pine nuts
1 tbsp. finely chopped fresh rosemary
1 tbsp. orange zest
1 tsp. baking powder
1/4 tsp. kosher salt
5 ozs. ( 2/3 cup) mascarpone cheese, room temp.
4 large eggs
1 1/3 cups sugar
1/2 cup ( 1 stick) unsalted butter, melted
Orange Syrup:
1/2 cup fresh orange juice
3 tbsp. granulated sugar
Orange Glaze:
1 tbsp. whole fresh rosemary leaves ( stripped from the stem but not chopped)
1 1/2 cups confectioners' sugar
5 tbsp heavy cream
2 tbsp fresh orange juice
1 tsp. orange zest
******************************
Preheat oven to 350. Butter a 9" x 2" round cake pan. Line the bottom with parchment paper and butter the parchment.
1. In a medium bowl, whick together the flour, cornmeal, pine nuts, rosemary, orange zest, baking powder and salt. Set aside.
2. In a large bowl, whisk the mascarpone to loosen it a little. Add the eggs, one at a time, whisking to combine.
3. Add in the sugar and whisk til smooth.
4. Using a rubber spatula, fold the dry ingredients, in two batches, into the wet, mixing til smooth.
5. Stir in the melted butter with a rubber spatula, til well blended.
6. Spread the batter evenly into the prepared pan and bake til the entire top of the cake is a rich golden brown and springs back when pressed gently in the center, 40 to 45 minutes.
Make the orange syrup:
While the cake is almost finished baking, combine the orange juice and sugar in a small saucepan over medium heat and cook for a few minutes, stirring occasionally, til the sugar dissolves. Remove from the heat.
Once the cake has cooled about 5 minutes in the pan, invert it so it's right side up.
Poke a few dozen holes, with a skewer or toothpick, into the top of the warm cake and brush with the warm syrup. Continue brushing for several minutes, giving the syrup time to sink into the cake, til you have used all the syrup. Let the cake cool completely.
Make the orange glaze:
1. Bring a small saucepan of water to a boil. Have ready a small bowl of ice water.
2. Put the rosemary leaves into the boiling water and blanch them for a minute.
3. Scoop them out and immediately place them into the ice water. Drain them and spread them out onto a paper towel to dry.
4. In a bowl, whisk the confectioners' sugar, cream and orange juice til smooth. Then whisk in the blanched rosemary and the zest.
5. When the cake has cooled, spoon the glaze over the cake. Let it drip over the sides.
( Excess glaze will spill over so you may want to do this over a larger plate or even a baking sheet to catch the drips!).
Let the cake sit for at least an hour before cutting.
Note: This is one of those cakes that just gets better over time. Enjoy!
Subscribe to:
Posts (Atom)