Wednesday, September 30, 2009

Reading Terminal Market...and other "Beautiful Views"!!

Ok, let me first explain this crazy picture, then I'll get to explaining the title of this post! Yes, that's chocolate you're looking at in the shape of noses, hearts(human) and a Philly Cheesesteak!!(With "Cheese Wiz").
About the "beautiful views"...Today my Temple student son and I had to go into Philly to get answers to some very important questions concerning his rental unit. As you will clearly be able to see from the last 2 photos I posted, the apt. is not only in a terrible area but it has numerous building code violations and is unfit for anyone to live in. So we needed to get some answers to my many questions, that I won't go into here...suffice to say it's a big mess!!The situation and the rental. Anyone else out there ever find themselves in this kind of situation?? Do let me know, won't you?
Our first stop, since we had time to kill, was the Reading Terminal Market which I haven't been to in years. It's really a fun place to shop with lots of different stalls selling everything from meats and fish to baked goods, fresh vegetables and fruits and, my favorite, gyros!!
As we walked around we spotted this chocolate shop selling these crazy mice shapes and human nose and heart shapes. Also, the Chocolate Philly cheesesteaks were pretty odd, too!
I bought a chocolate chip pecan cookie at the 4th St Bakery. They are priced by weight and one cookie cost $1.98. Yikes..they are heavy cookies!! It wasn't all that great. My biggest complaint with many bakery cookies is that all you taste is sweetness. I like to taste flavors in my cookies, such as a vanilla flavor or the flavor of the pecans. Not too fond of the texture either. So, it was just ok.
Then we walked over to LeBus Bakery and I got a biscotti to try. It clearly had butter in it, making it more cookie like than biscotti "like". Not bad.


So, how's this for a lovely neighborhood?? Wouldn't you just love to know your child is living among all this beauty?!! I took tons of pix but I really didn't think it would be right to post them all.


Another "beautiful view" out the back window. Yea, I'd say this neighborhood has a way to go yet before humans can live there.


Thursday, September 24, 2009

Pumpkins,Gourds and A Cute Amish Kid!!

I gave myself a day off from baking today. My friend Janet and I hit the road to go to the Antique Extravaganza out in Kutztown. Always in search of something..anything interesting in an antique or collectible I was very disappointed to have found nothing but I didn't come home empty handed.
I had a fun day taking lots of pictures of the area, pumpkins and gourds and one very cute, very bored little Amish ( or Mennonite) boy. He was just sitting on that hard cement block, bare foot holding on to the horse !! I wonder how long he had been sitting there?!
Soon after I took this picture, the boy, his mother and sister loaded up their belongings onto the buggy and took off down the side of the road with cars zooming past them. A common sight out there.


We found some really neat pumpkins and gourds for sale at the second market we went to at Shupps Grove. The colors and textures of these pumpkins were amazing and Janet brought home two of these stacks to put out front of the house.

These gourds were dyed in the prettiest colors of deep orange.


More interesting colors of yellow and white pumpkins. I never knew pumpkins came in such an array of colors and textures.


Tuesday, September 22, 2009

Pumpkin Sugar Cookies...Happy Autumn !!

Although I am really sorry that Summer is officially over, I do love the cooler temps and the changing colors of the foliage. The recipe for these cute frosted sugar cut out cookies came to me in a round about way. I was watching QVC early one morning...or was it late one night !!? OMG, I can't even remember !! And no, this is not something I do often!! Anyhoo, They were selling cute cut out cookies from Cheryl & Co. Cookies. Not really knowing much about the company or the product, I decided to check them out and I came upon a copycat recipe ( or so they claim) for the Cheryl & Co. cookies. I don't have any little ones in the house..just a big one!!( My 21 yr. old!) , but it was fun to take a little time to decorate these. I used the frosting recipe that is included with the recipe and tinted it with food coloring. I used green sprinkles for the stem but if I was going to make them again, I would decorate them with royal icing.
The flavor of the cookies was nice, not too sweet and I think they make a perfect "canvas" for frosting or icing. They are a soft cookie( like Cheryl& Co. claims theirs to be). They are rolled out 1/2" thick which makes them a good substantial sugar cookie.
So, go ahead...Celebrate the Fall season with some cute pumpkin shaped cookies...or any other shape that tickles your fancy!!

Friday, September 18, 2009

Trail Mix Cookies

Remembering back to last week at this time of day, I was so frazzled and stressed because I had decided to try some new recipes on a day I should know to reserve only for baking my regular "line up" of treats. So I did learn from my mistake, however, and I am happy to announce I owe it all to one word..yup.. just one little word...planning!!
It so happens that tomorrow I have not just one market to do but 2 !! And I'm still way ahead of schedule!! And I owe it all to planning my week and spacing myself.
Ok, so much for my idle ramblings!! Let's get to the cookies!!
I found this recipe when I was perusing the internet and, you know how you just keep clicking on one thing, then another and finally find something that interests you? Well, that's how it happened. They are originally called Cowboy Cookies from this site. I made them a few weeks back and they were great but as usual, I wanted to put my own spin on them so I came up with my version of Trail Mix Cookies. They are sweet and salty if you use nuts and raisins but you can use your own mix of favorite add ins and they will still be great!
These would be lots of fun to make with your kids because the little ones can get in there and form the balls of dough and have a great time!! (My kids, being 21 and 32 yrs. old however, aren't into the making...just the eating!!)
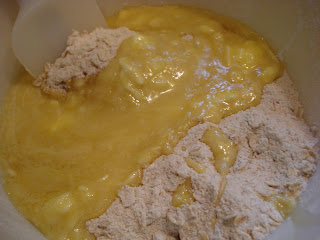
Mix the wet ingredients into the dry, using a heavy spoon or fork. The mixture will be very crumbly.

Throw you favorite add ins into the mix and stir with the fork or heavy spoon for a while, switching to your hands toward the end.

With damp hands, form into balls, either 1 1/2" in size for smaller size cookies or about 2" ( 2 oz. ) in size for larger cookies.


Once they cool, they have a wonderful crackly top, with crunchy edges and chewy insides and just the best flavor. So go, bake , eat and enjoy!
Trail Mix Cookies
Preheat oven to 350.Line baking sheets with parchment paper.
Whisk in large bowl:
1 1/3 cups AP flour
1 tsp. baking powder
1 tsp. baking soda
1/4 tsp. salt
1 cup old fashioned oats
1/2 cup brown sugar
1/2 cup white sugar
Mix in small bowl:
1 egg, beaten
1/2 cup( one stick) butter, melted slightly in micro and cooled
1 tsp. vanilla
1 - 1 1/4 cup total add ins: Use what you like such as: Semi sweet choc. chips, white choc. chips, M&M's, peanuts, coconut, raisins, pecans or any kind of nut you like or even crushed pretzels? Just don't use more than 1 and 1/4 cup total. If you do it makes the ratio of dough to add ins too much and you wind up with left over add ins at the bottom of the bowl.
Mix the wet ingredients into the dry and stir with heavy spoon or fork. Add the add ins and stir using your slightly dampened hands. Form into balls in either 1 1/2 " or 2" size, again wetting your hands slightly so the dough doesn't stick to your fingers.
Place 2 " apart on baking sheets and bake 11-12 minutes for small and 12-13 for larger size. They should be slightly golden on the edges but still look a little moist in the center when you take them out of the oven. Let them cool on sheets about 5 minutes, then transfer to wire racks. As they cool, they flatten and crackle a bit.


Tuesday, September 15, 2009

Pumpkin Pecan Biscotti

I decided to try one of the recipes again that didn't work for me last Friday. I figured that if I took my time that perhaps it wasn't so much the recipe as..well,... me who screwed up!! I was right...it was me!! But I have to admit that making some changes in the baking time and log sizes allowed this Pumpkin Pecan Biscotti recipe to work...finally!!
It has a nice subtle pumpkin pie kind of flavor and the addition of the toasted pecans was my idea. I just love nuts in cookies and pecans and pumpkin seemed to be a good combo. Leave out the nuts if you don't care for them or you can certainly add other things like, white chocolate chips, semi sweet chocolate chips, craisins, whatever!! So, go ahead and give it a try. I added my notes along the way to be sure your biscotti comes out perfect!!

Pumpkin Pecan Biscotti
Preheat oven to 350.

Sift the following ingredients in a large bowl:
2 1/2 cups AP flour
1 cup sugar
1 tsp. baking powder
1 tsp. cinnamon
1/2 tsp. nutmeg
Pinch of ginger
Pinch of cloves
Pinch of salt

In medium sz. bowl whisk:
2 eggs
1/2 cup pumpkin puree
1 tsp. vanilla

Add 1/2 cup toasted pecans( or whatever you choose).

1. Pour pumpkin mixture and add in's into dry ingredients and stir with heavy spoon. The mixture will seem very crumbly and dry.(Don'y worry, it comes together once you use your hands to combine).
2. With floured hands, lightly knead dough in the bowl til it's nicely combined.
3. If you want smaller biscotti, divide dough in half and with floured hands, place 2 logs onto a baking sheet lined with parchment. If you want larger biscotti, just make one log.
4. Ok, here's the tricky part. Make sure that the log is only 1/2" high. This is important because if it's thicker, your biscotti will not be fully cooked along the top. (At least this was my unfortunate experience). Shape into whatever size rectangle you want, just remember to keep the 1/2" height. (They will rise and spread while baking).
5. Bake about 30 minutes for the smaller size and a bit longer for the larger size. Be sure they are nice and firm when pressed before taking out of oven. ( again, if not, they may be undercooked along the top).
6. Let them cool for 15 minutes. Lower oven temp. to 300.
7. Slice , using a serrated knife, about 1/2" thick.
8. Place slices back onto baking sheet and bake again for 15 minutes.

Sunday, September 13, 2009

Brownies, sunflowers and a sunny market day...finally!!

Chocolate Chip Marshmallow Brownies...finally perfect!!

Winning Sunflowers !! We had a sunflower contest at the market today!! Such huge flowers!!


Pretty colorful market veggies and melons.


Ever had one of those crazy days where nothing goes right? Well, mine was Friday. This is usually a day reserved strictly for baking for the weekend markets, but what did I decide to do?... Well I thought I'd like to try a few new recipes...bad idea!

I wanted to try making pumpkin biscotti so I gathered 3 recipes I found on line and baked the first one. The results were awful!! It didn't cook all the way through so it was raw on the top of the slice and overcooked on the bottom. In the trash it went.What a waste.

The next recipe I tried said to make the biscotti 1/2 " thick. I really haven't a clue what the heck happened to this one!! It never rose and stayed like a big lump. Second one in the trash..Yikes!! What's happening?!!

Ok, so I finally got smart and decided to quit trying to make pumpkin biscotti for the day. I mean, it was only about 9 o'clock in the morning by now and I'd already screwed up twice!! Best idea I had so far!! So what does this have to do with brownies...you may be wondering?

Well, I needed to begin my usual baking so I started with a batch of chocolate chip marshmallow brownies I always make. Made them, let them cool and cut them all into the correct size pieces. Decided to taste one and much to my horror I realized I only put in one cup of sugar. They were awful!! Yep, in the trash they went. At this point you'd think I should have gotten back into bed and thrown the covers over my head and slept through the weekend...but nope I just kept going, made another smaller batch and they came out, as usual, great!

So, after a stressful day, what did I learn from all this? Never to try any new recipe on Fridays during the market season and pay attention to my ingredients!! And, of course, always do a taste test because you...err rather I..just never know when I might leave out something!

So here's my recipe for really great:

Chocolate Chip Brownies:

Chocolate Chip Marshmallow Brownies

4 oz. unsweetened chocolate ( I use the Hershey Baking Bar)

2 sticks unsalted butter

1 tsp espresso or instant coffee powder

2 cups sugar( be sure to add both cups!! Ha Ha!)

1 tsp. vanilla

4 eggs

1 cup AP flour

2 cups miniature marshmallows

1 cup chocolate chips

Preheat oven to 350. Spray 9" x 13" pan with Pam. Line with heavy duty foil adding extra foil to hang over sides ( to lift them out later) and spray foil lightly with Pam. Set aside.

In saucepan, melt butter and chocolate squares. Add the espresso or instant coffee powder and stir. Set aside to cool to room temp.

Put sugar in a large bowl and beat in eggs, one at a time.

Stir in flour, then vanilla.

Fold in marshmallows and chips and lightly stir in melted chocolate til just blended.

Spread batter into pan. Bake 30 minutes or til toothpick comes out clean. (I tend to bake a little more as I don't like my brownies too underdone but this all depends on how you like your brownies).

Let them cool completely in pan ( I usually let them stay in pan at least 2 hours) and lift them out of the pan using the extra foil. When I cut them, I use a large serrated knife which I clean with hot water each time I make a cut. This makes it easier to get a clean cut without lots of crumbs falling off.

Note: I often halve this recipe and use an 8" square pan.

Tuesday, September 8, 2009

Granola Grabbers

I've been experimenting with lots of granola recipes lately and when I found Dorie Greenspan's Cookbook "Baking From My Home To Yours" in the library, I brought it home and found this Granola Grabbers Cookie recipe.
It calls for granola without any fruit so I put together a batch of granola, left out the dried fruits and used it for this recipe.
So, ok, I have to say the name of this recipe says it all!! I couldn't wait til they cooled to try a bite...but I couldn't stop at one bite !! They're that good! And while writing this post my son came home and gobbled down three!! Yup...they're that good !! He said he liked that they weren't too sweet.
I'm not really convinced that using store bought granola with fruit would make the fruits dry but she seems to think so..and she's the pro, right?!
I used my own homemade granola and the cookies have a wonderful sweet and salty flavor with the raisins for the sweet and salted peanuts for the salty. A winning combo!

Granola Grabbers
3 cups granola
3/4 cup moist plump raisins ( dark or golden)
1/2 cup salted peanuts
1/2 cup slivered almonds
1/2 cup sweetened shredded coconut
1/3 cup wheat germ
14 tbsp. unsalted butter( room temp.)
3/4 cup packed light brown sugar
1/4 cup sugar
1 large egg
1/4 tsp. salt
1 cup AP flour
Preheat oven to 375. Line 2 baking sheets with parchment paper.
Put granola in a lerge bowl and break up any clumps with your fingers.
Add raisins, peanuts, almonds,coconut, and wheat germ and mix together.
With stand mixer, using paddle attachment, beat butter at medium speed til smooth, about 2 mins. Add sugars, and beat for another 3 mins. or til creamy.
Add egg and salt and beat til well blended. Reduce mixer to low and add flour, mixing only til incorporated, then steadily add granola and fruit.
Stop mixer when most of the granola mix is blended into the batter. Finish mixing with a sturdy rubber spatula, making sure to get any bits at the bottom of the bowl.
Scoop out rounded tablespoonfuls of dough, packing the scoops between your palms and place mounds on prepared baking sheets, leaving about 1 1/2 inches between them. Flatten slightly with fingertips.
Bake for 10 - 12 minutes. Cookies should be golden brown but not firm. As they cool, they harden up a bit. Allow to rest on sheets 1 - 2 minutes. Transfer to wire racks to cool completely.

LinkWithin

Related Posts with Thumbnails