Saturday, December 24, 2011

Christmas Butter Cookies

Hope everyone has a wonderful Holiday!

I made these delicious buttery and so easy butter cookies that uses a cookie press. I have a vintage press, that you can actually buy in several of places these days, such as ebay, or even a flea market. I prefer these vintage ones to any newer ones made today.

But getting back to the cookies, it's only 4 ingredients, butter, sugar, flour and salt. So simple, yet so good.

Perfect for those last minute Christmas cookie for Santa tonight!

Butter Cookies ( for a cookie press)
(Note: I halved this recipe below and it made 4 1/2 dozen cookies)

1 lb. butter, unsalted at room temp.
1/2 cup sugar
1/2 tsp. salt
4 cups AP flour ( 18 ozs.)
*************************
Preheat oven to 375.
1. Beat butter and sugar til light and fluffy.
2. Beat in the salt and flour, mixing til well blended.
3. Fill the cookie press with as much dough as will fit and press each cookie onto ungreased baking sheets. Decorate with colored sprinkles.
4. Bake for approx. 10 minutes, depending on how hot your oven gets. This baking time may take a little longer or less time. The cookies should be lightly brown along the edges but not too dark.
5. Cool on wire rack, then enjoy!
Merry Christmas!

Monday, November 28, 2011

Pumpkin Scones Revisited

Before I get to the pumpkin scone, I just want to say... I dropped my camera into the kitchen sink the other day and totally broke it so this photo is the best I could come up with!

I received a comment today from regarding my pumpkin scone recipe. http://thecookiescoop.blogspot.com/2011/02/pumpkin-scones-with-maple-glaze.html
Here's the comment:
I tried this recipe as I thought the combination of spices would be delicious. I'm going to go back to my recipe that used butter and sugar. The scones I made with this recipe were hard, dry and tasteless. Using sugar and butter will vastly improve the texture and flavor.

So after reading the comment from "anonymous" I decided to make the scones again this afternoon. Maybe, I thought, I got lucky the first time with this recipe and they just happened to come out great. I thought maybe they're really not as great as I thought they were. Well, guess what, They are great!

I found these scones to be light, moist and delicious, just like the first time I made them. These are cream scones so they don't have egg or butter in the recipe. They rely on the fat from the cream and the pumpkin puree to give them moistness.

There are certain steps that need to be taken when making scones.

First, all the ingredients need to be very cold. The butter, if using, needs to be cold ( or frozen) and cut into small pieces. The cream needs to be cold, even the bowl should be cold.

Second, you need to mix the wet with the dry very lightly and only til just incorporated. If you overmix the scones will come out hard.

And lastly, make sure your measurements are correct. If your cup of flour measures 5 ounces, rather than mine at 4.5 ounces, then you're using too much flour, which can change the recipe and lead to a dry hard scone.

So, anonymous, I'm sorry your pumpkin scones came out dry, hard and tasteless.

Oh and one more thing. If you don't put the glaze on top, yes, they will not be very sweet.

Monday, October 31, 2011

Apple Walnut Cake

I'm plowing through those Fine Cooking magazines I received recently, trying to make at least one thing from each issue.

This snack cake is wonderfully moist, with a nice crunchy walnut topping. The original recipe was supposed to be made in a 9 x 13 pan but I knew that would be way too much for our small family so I halved it, which was way easy,  and used an 8" square pan, and it turned out perfect. (The recipe I'm giving you, though,  is for the full amount.)

It's an easy cake to throw together and it's great for breakfast or a late night snack!


Start by combining your dry ingredients in a medium bowl.


Beat the butter and sugar together, then add the eggs, one at a time. Add in one third of the flour mixture, then the applesauce. Add another third of the flour mixture, then the sour cream. Finish mixing in the remaining flour mixture...

Then pour the batter into your prepared pan.


While the cake bakes, make the walnut topping by combining the ingredients, then chill til needed.


Take the cake out of the oven after 15 minutes, then sprinkle on the topping and continue to bake another 30 minutes.


Apple Walnut Cake ( from "Fine Cooking" Magazine Nov. 2004)

Serves 16

2 cups ( 9 ozs.) AP flour
1 tsp. baking powder
1 tsp. baking soda
3/4 tsp. cinnamon
1/2 tsp. table salt
3 ozs. ( 6 tbsp.) unsalted butter, softened at room temp.
1 1/4 cups granulated sugar
2 large eggs, room temp.
3/4 cup smooth applesauce ( homemade or store bought)
1 cup sour cream
Walnut topping ( recipe below)
*****************************
Preheat oven to 350. Butter the bottom and sides or a 9 x 13 baking pan. Line the bottom with parchment paper and butter the parchment.
1. In a medium bowl, whisk the flour, baking powder, baking soda, cinnamon and salt. Set aside.
2. Combine butter and sugar in a large bowl and beat with an electric mixer on medium speed til combined ( but not fluffy). Scrape the bowl as needed.
3. Add the eggs, one at a time, beating to combine and scraping the bowl.
4. Add one third of the flour mixture, mixing on medium low speed til combined.
5. Add the applesauce, mixing on medium low speed til incorporated.
6. Mix in another third of the flour mixture, then the sour cream, then the remaining flour mixture, scraping the bowl. Don't overmix. Just combine til incorporated.
7. Spread batter into your prepared pan and bake 15 minutes.
8. Make the walnut topping and place in the fridge.
9. Take the cake out of the oven and sprinkle with the topping, then place the cake back in the oven for another 30 minutes, or til a toothpick comes out clean ( Mine took a little less time but it depends on your oven).
10. Cool cake on wire rack for about 20 minutes. Serve warm.
Walnut Topping:
1/2 cup ( one stick) unsalted butter
1/2 cup firmly packed light brown sugar
1/2 cup granulated sugar
1 1/4 tsp. cinnamon
1 cup ( 4.5 ozs.) AP flour
1/4 cup confectioners' sugar
4 ozs. ( 1 cup) whole walnuts, coarsely chopped

 Melt the butter, then pour into a medium bowl. Add brown sugar, granulated sugar and cinnamon and stir til blended. Add the flour, confectioners' sugar and walnuts, mixing with your fingers til well combined. The mixture should be crumbly but clump together. Refridgerate til ready to use. 

Monday, October 24, 2011

Cornmeal Rosemary Cake with Pine Nuts & Orange Glaze

I've been trying to figure out how to begin this post since I've been away from it for so long now. It's been well over a month and I have to admit, it feels a little odd just typing this post. It's funny how, once you stop posting for a day, then a week, then a month, you figure, well, so much time has passed, what's another day!

Truth is, I've been so busy with my baking business that I've had no extra time to make a lot of new recipes, although I did manage to make a few, which I hope to share with you in the future.

So, okay, let's get to this wonderful cake. A woman from the Farmer's Market where I sell asked me if I'd like some Fine Cooking magazines and, of course, I was happy to take them off her hands! I wasn't actually familiar with this magazine before but it really a great one, with lots of excellent recipes.

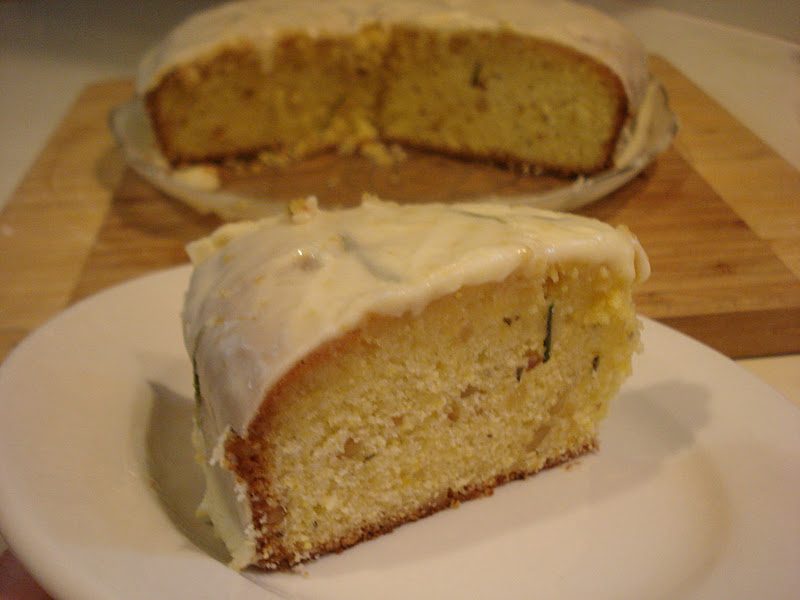
This Cornmeal Rosemary Cake has chopped pine nuts, mascarpone cheese and lots of fresh orange zest to give it a wonderful flavor, especially with the rosemary. And, it's fairly easy to make. You don't have to drag out the standing mixer, everything is mixed or whisked by hand in a few bowls.

It gets an orange syrup that you brush on top, then an orange glaze with the rosemary...so good!

Begin by combining your dry ingredients together with the orange zest.
Then whisk the mascarpone cheese and add the eggs, one at a time, then the sugar.   

Fold in your dry ingredients, in 2 batches...


Then stir in the melted butter.
Pour the batter into your prepared cake pan and bake.


After you take the cake out of the oven and invert it, brush on the syrup.


While the cake is cooling, make the glaze.


Then spoon the glaze over the cooled cake and let it set up a few hours.

Cornmeal Rosemary Cake with Pine Nuts & Orange Glaze ( from "Fine Cooking" magazine, Nov. 2004)

Makes one 9" cake

Cake:

Soft butter for the pan
6 3/4 ozs. ( 1 1/2 cups) AP flour
3/4 cup finely ground yellow cornmeal ( Quaker brand is fine)
1/3 cup coarsely chopped toasted pine nuts
1 tbsp. finely chopped fresh rosemary
1 tbsp. orange zest
1 tsp. baking powder
1/4 tsp. kosher salt
5 ozs. ( 2/3 cup) mascarpone cheese, room temp.
4 large eggs
1 1/3 cups sugar
1/2 cup ( 1 stick) unsalted butter, melted

Orange Syrup:
1/2 cup fresh orange juice
3 tbsp. granulated sugar

Orange Glaze:
1 tbsp. whole fresh rosemary leaves ( stripped from the stem but not chopped)
1 1/2 cups confectioners' sugar
5 tbsp heavy cream
2 tbsp fresh orange juice
1 tsp. orange zest
******************************
Preheat oven to 350. Butter a 9" x 2" round cake pan. Line the bottom with parchment paper and butter the parchment.

1. In a medium bowl, whick together the flour, cornmeal, pine nuts, rosemary, orange zest, baking powder and salt. Set aside.
2. In a large bowl, whisk the mascarpone to loosen it a little. Add the eggs, one at a time, whisking to combine.
3. Add in the sugar and whisk til smooth.
4. Using a rubber spatula, fold the dry ingredients, in two batches, into the wet, mixing til smooth.
5. Stir in the melted butter with a rubber spatula, til well blended.
6. Spread the batter evenly into the prepared pan and bake til the entire top of the cake is a rich golden brown and springs back when pressed gently in the center, 40 to 45 minutes.

Make the orange syrup:
While the cake is almost finished baking, combine the orange juice and sugar in a small saucepan over medium heat and cook for a few minutes, stirring occasionally, til the sugar dissolves. Remove from the heat.

Once the cake has cooled about 5 minutes in the pan, invert it so it's right side up.
Poke a few dozen holes, with a skewer or toothpick, into the top of the warm cake and brush with the warm syrup. Continue brushing for several minutes, giving the syrup time to sink into the cake, til you have used all the syrup. Let the cake cool completely.

Make the orange glaze:
1. Bring a small saucepan of water to a boil. Have ready a small bowl of ice water.
2. Put the rosemary leaves into the boiling water and blanch them for a minute.
3. Scoop them out and immediately place them into the ice water. Drain them and spread them out onto a paper towel to dry.
4. In a bowl, whisk the confectioners' sugar, cream and orange juice til smooth. Then whisk in the blanched rosemary and the zest.
5. When the cake has cooled, spoon the glaze over the cake. Let it drip over the sides.
( Excess glaze will spill over so you may want to do this over a larger plate or even a baking sheet to catch the drips!).
Let the cake sit for at least an hour before cutting.
Note: This is one of those cakes that just gets better over time. Enjoy!

Thursday, September 15, 2011

Date Nut Bread

I remember, as a kid, loving date nut bread smeared with cream cheese. It was moist and full of great flavor from the dates, and, of course, the nuts, which gave it the crunch I always love! So when I found this recipe using molasses and dark brown sugar I knew it would be great.

I had actually made another recipe I found in a cookbook I recently purchsed but it didn't have molasses or dark brown sugar in it and, as I should have figured out, it really wasn't very good.

This recipe also uses whole wheat flour which is always a good thing in baking!
If you remember the dark date nut bread that was available in cans, as I do, then you'll love this one. And if you don't remember it, bake it anyway! It so good. Don't forget the cream cheese!

The recipe is quite easy to make.
You need to add boiling water to the chopped dates and butter, puree one third of this, then add it back into the bowl with the rest of the dates/butter mixture.
Then add the brown sugar, molasses and eggs and stir to combine.

Combine the dry ingredients in a large bowl and make a well in the center.


Pour in the date mixture and add in the nuts. Mix til it's all combined.


Then pour the batter into a loaf pan and bake for approx. 50 minutes, or til a tester comes out clean.


Date Nut Bread

3/4 cup boiling water
1 1/2 cups chopped dates ( fresh)
1 tbsp. butter
1/4 cup dark brown sugar
1/4 cup dark molasses
2 large eggs
1/2 cup AP flour
1/2 cup whole wheat flour
1 1/2 tsp. baking powder
1/4 tsp. baking soda
1/4 tsp. salt
1 cup chopped walnuts
***************************
Preheat oven to 350. Grease a 9x5" loaf pan. Set aside.

1. In a medium bowl, pour boiling water over chopped dates and butter. Stir the mixture and let it cool to lukewarm.
2. Pour one third of the mixture into a food processor or blender to make a paste, then stir it back into the date mixture.
3. Add the brown sugar, molasses and eggs and stir to combine.
4. In a separate large bowl, whisk the flour, baking powder, baking soda and salt.
5. Make a well in the center and pour in the date mixture and the nuts and mix til all the ingredients are combined.
6. Pour the batter into the greased loaf pan and bake for 50 minutes, or til a toothpick inserted into the center comes out clean.
7. Cool the bread 10 minutes in the pan, then turn it out of the pan to finish cooling.
Spread slices with cream cheese. Enjoy!

Monday, September 5, 2011

Sour Cream Coffee Cake

This is actually a retro coffee cake recipe from 1959. Apparently it has been served in high schools in Los Angeles since then and it's still made. Any cake still going strong after that many years has got to be good! And it is.

It's easy to throw together and it has a layer in the middle of brown sugar, butter and walnuts and, of course, the sour cream makes it nice and moist.

It's one of those cakes that gets better the next day, and then the day after that..and so on!

If I made one little change, it would be that I'd cut  back on the amount of filling. It seemed like a little too much, but other than that, it's great.

Make the filling first, then set it aside while you make the cake.


After half the batter is in the pan, sprinkle the filling over top, then spoon the remainder of the batter over that, then finish with the rest of the filling ( well, now it's the topping!).


The cake bakes up and around the filling, making it so delicious.


So here's the thing...when I went to flip the cake over, it fell! I was able to save all of it but it didn't look as pretty on one side so I made another half batch, this time making the batter into jumbo muffins. I only got 5 out of this half batch. They were also great.


And I put a quick maple glaze over the muffins. It's not really necessary but kind of looks pretty!
Just combine 2 -3 tablespoons of maple syrup with 1/2 cup of comfectioners' sugar til it gets a thin consistency, then just drizzle over top.


1959 Sour Cream Coffee Cake ( from the LA Times, 1994)

Cake:
1 1/2 cups cake flour
1/2 cup flour
1 tsp. baking soda
1 tsp. baking powder
1/4 tsp. salt ( my addition)
1 cup sugar
1 egg, lightly beaten
1 tsp. vanilla
1 cup sour cream
Topping:
1/4 cup flour
3/4 cup brown sugar
1/4 tsp. salt
1/2 tsp. cinnamon ( my addition)
1 cup chopped walnuts ( I'm sure pecans or even almonds would be fine)
1/4 cup butter, softened
*************************
Preheat oven to 350. Butter and flour a 10" tube pan.
All ingredients should be at room temp.

1. In a small bowl make the filling by combining all the ingredients together with a fork or your fingers, making sure the butter is thoroughly worked into the mixture. Set aside.
2. In a medium bowl, combine flours, baking soda, baking powder and salt. Set aside.
3. In a mixing bowl, cream the butter and sugar til light and fluffy, about 2 minutes.
4. Add the egg and vanilla and mix well.
5. Add half the dry ingredients and mix til just blended, then add in the sour cream.
6. Add in the remainder of the dry ingredients and mix til it's all incorporated.
7. Spread hald the batter into your prepared pan, then sprinkle half the filling over top. Spread the remaining batter over this and finish by sprinkling the top with the remainder of the filling.
8. Bake for 40 to 45 minutes, or til a toothpick inserted into the center comes out clean.
9. Let the cake cool in the pan for about 15 minutes, then remove it from the outer sides of the pan and allow it to cool completely. Turn it over...(very carefully!) then turn it again so it's right side up.


Sunday, August 28, 2011

Lemon Bliss Cake

This cake may not look like much from my photo but the name says it all...lemon bliss!

It packs a powerful punch of flavor from the lemons in the cake, using the zest, which has all the flavor, and a lemon glaze brushed on top of the warm cake.

It's moist and tangy, with a tight crumb.

As all cakes of this kind, it only gets better the next day or two, so go grab some lemons and make this cake!
Serve it with whipped cream and maybe some fresh blueberries sprinkled on top. Yum!

It begins, like most cakes, with creaming the butter and sugar til fluffy and light.
Then add in the eggs, then the dry ingredients, alternately with the milk.


Throw in lots of lemon zest, which gives it it's great lemony flavor.


Spoon the batter into your favorite bundt pan and smooth the top.


Then brush on that lovely lemon glaze.

Lemon Bliss Cake (from  King Arthur Flour)

Cake:
1 cup (2 sticks or 8 ozs.) unsalted butter
2 cups sugar
1 tsp. salt
4 large eggs
2 tsp. baking powder
3 cups AP flour (I used 13.5 ozs.) ( I always use King Arthur Flour)
1 cup milk
Finely grated rind of 2 lemons OR 3/4 tsp. lemon oil

Glaze:
1/3 cup freshly squeezed lemon juice
3/4 cup sugar
*******************************
Preheat oven to 350. Butter and lightly flour a 10" tube pan or a 9" to 10", 9 to 10 cup capacity bundt pan.

1. In a large mixing bowl, beat together the butter, sugar and salt, then cream til light and fluffy, about 2 minutes.
2. Add the eggs, one at a time, beating well after each addition.
3. Add the baking powder, then add the flour alternately with the milk, beginning and ending with the flour. Mix til smooth.
4. Stir in the grated lemon zest ( or the lemon oil, if using).
5. Spoon the batter into your prepared pan and smooth the top with an offset spatula.
6. Bake the cake 55 to 60 minutes, or til a toothpick inserted into the center comes out clean.
7. While the cake is finishing it's baking, make the glaze by combining the sugar and lemon juice in a small bowl. Set aside.
8. Once the cake comes out of the oven, set it aside on a wire cake to cool 5 minutes. Run a knife around the edges to loosen and turn the cake out onto the rack. Place another rach on top and turn the cake over so it's right side up.
9. Poke the hot cake all over the top with a cake tester or toothpick. Stir the glaze again, then brush the top with the glaze, letting it sink in, then brush on more glaze, continuing til all the glaze is used.
10. Allow the cake to cool completely before slicing.

Wednesday, August 24, 2011

Lemon Curd French Tart

This is for anyone and everyone out there who has a fear of making pie crust. And even for those who have advanced skills in pie crust making...this crust is amazing!

I read about it here a while back and kind of forgot about it. But then the other day, I got to thinking about my delicious lemon curd and decided to put it into a tart.

 Making a dough from hot butter, rather than ice cold, disputes all the ideas about only using cold ingredients. I don't actually know why it works...but it works...and that's all I need to know!

You can fill the tart with anything you'd like from a curd, like I did, to a pastry cream or custard with fresh fruit. I used my lemon curd recipe to fill the tart and then just piped some whipped cream on top.

It's really the flakiest crust I've ever had and it's also the easiest crust I've ever made. So for all you bakers who are still buying a store bought crust because you're too nervous to try making one from scratch...give this one a try. You'll love it!


Begin by placing the butter pieces, oil, water, sugar and salt in a heatproof bowl. ( I used my pyrex bowl.)
Place the bowl into the oven for about 15 minutes, or til the butter begins to brown slightly and bubble.


It should look like this, nice and melted.


Then dump in the flour...


And stir til it becomes a ball.
And that's pretty much it! Now, was that so hard?

Dump the ball onto your tart pan (you might want to let it cool a little bit first),  spread out the dough using the heel of your hand. Push it towards the edge and press the edge with your fingers.
Save a little bit of dough, about the size of a marble, to patch any cracks that may occur after baking.
Prick the dough with a fork in about 10 to 12 places.

Bake 15 minutes and use the reserved dough to patch any sizable crack, if you have any.


Fill with your fave filling, then decorate...and dive in!


Lemon Curd French Tart (adapted from here)
Makes one 9" tart or 3 to 4 tartlets( with removable bottom) or 9" pie plate.

Note: My tart pan actually measured 9 1/2" and I think that's why my tart came out on the shallow side. This really wasn't a problem but if you use a pie plate or tart pan with a removable bottom, just know if it's not exactly 9" your tart may come out shallow also. I haven't made this recipe using tartlet pans so I'm not sure if it would make 3 or 4 but I bet they'd be darned cute...and delicious!
Also David says because small cracks in the dough are normal you'd be better to not use a thin custard filling.

3 ozs. unsalted butter, cut into small cubes
1 tbsp. canola oil
3 tbsp. water
1 tbsp. sugar
Pinch of salt
5 ozs. AP flour
Lemon curd recipe
Whipped cream for decorating top

*********************
Preheat oven to 410.
1. In a heatproof bowl ( I used my glass pyrex), place the butter pieces, oil, water, sugar and salt and place into the oven for 15 minutes, or til the butter begins to bubble and brown around the edges. Remove carefully.
2. Dump the flour into the melted butter mixture and stir into a ball with a spatula.
3. Place the ball into your tart or pie pan and, when cooled enough to handle, press the dough with the heel of your hand to spread out to the edges. Use your fingers to press the sides of the dough .
Reserve a small piece of dough, about the size of a marble, to patch any cracks later.
4. Prick the dough all over with a fork, then place back in the oven for 15 minutes, or til the dough gets a nice godlen color.
5. Patch any large cracks with the reserved dough piece.
Let the crust cool completely before filling with your favorite custart and fresh fruit, pastry cream or, like me, most delicious lemon curd!

Thursday, August 18, 2011

White Chocolate Cherry Chunker Cookies

I feel like I have this black cloud hanging over my kitchen this week.
Well, okay, maybe that's a bit dramatic!

But seriously, I can't seem to make anything come out right. I made a stone fruit slump which came out okay but not fantastic...so why would I want to show you something that was just okay? Then last night I made a recipe from Cook's Country called Texas Style Blueberry Cobbler. Again..was just okay. That's not how I like my cobblers ( sorry Cook's Country!) Geez...what's going on?

So today I decided to just make a new cookie recipe...all the while keeping an eye out for that cloud! But finally, success!

These cookies are from the book, "The Sweeter Side of Amy's Bread" and they're a wonderful mix of tart dried cherries and sweet white chocolate chips, a great balance and combination of flavors. Oatmeal in there helps add a nice texture. The book says to make them 3.5 ounces, but that's just too big for me so I made mine 2.2 ounces in size and they wound up baking about 3 1/2" in size. Perfect...finally!

Begin by combining your dry ingredients in a medium bowl.

Cream the butter and sugars together...

Then mix the eggs and vanilla and add to the creamed mixture.

Add in the dry mixture and combine just til it's all well mixed together.

Stir in the white chips and dried cherries.

And scoop them onto your baking sheet, then flatten each one slightly. Then bake.

White Chocolate Cherry Chunkers, from "The Sweeter Side of Amy's Bread"

Makes a dozen large cookies ( 3.5 oz. size) or more like 18 cookies (2.2 oz. size)

1 2/3 cups ( 8.6 oz.) AP flour
2 1/4 cups old fashioned rolled oats
1 1/4 tsp. baking soda
1/2 tsp. kosher salt
2 large eggs
1 1/4 tsp. vanilla
1 cup dried tart cherries
3/4 cup white chocolate chunks or chips
1 cup ( 2 sticks or 8 oz.) unsalted butter
1/2 cup dark brown sugar, firmly packed
5/8 cup sugar
******************************
Preheat oven to 350. Line baking sheet with parchment.
1. In a medium bowl, combine the flour, oats, baking soda and salt and whisk.
2. In a small bowl whisk the eggs with the vanilla and set aside.
3. In a mixing bowl, cream the butter and sugars til light and fluffy, about 2 minutes, scraping the sides and bottom of the bowl often.
4. Gradually add the egg mixture til it's all combined.
5. On low speed, add the flour mixture in stages. Mix only til everything is well combined, again scraping the sides and bottom of bowl.
6. Add the cherries and chocolate and stir gently to combine.
7. Scoop out the dough and flatten each to a thickness of approx. 1 1/4".
8. Bake 15 to 17 minutes, depending on size. They should be golden brown and baked all the way into the center.
9. Cool on sheet 5 minutes, then transfer to wire rack to cool completely.

LinkWithin

Related Posts with Thumbnails