Tuesday, April 13, 2010

Strawberry Bread

I can't seem to get my fill of strawberries these days. With every trip to the supermarket, I bring home a container or two. So when I went looking for an interesting cake recipe, I wanted one to include strawberries and I came across this one from my "America's Best Lost Recipes" Cookbook by the editors of "Cooks Country Magazine". It's actually called "Mama Honey's Strawberry Bread". It's a kind of tea cake type of bread, or a sweet bread.
As I read the recipe, one thing that I noticed was that it used quite a large amount of cinnamon. I wasn't too sure about the flavors of cinnamon with the strawberries. In fact, as you see from the photo, because of all this cinnamon, the bread came out a darker color.
I would have preferred a strawberry bread with a lighter, more golden yellow color...more like Spring! It tasted really good though. It was nice and moist and the strawberries pieces really did provide moist pockets, as they stated in the book. But I still think the cinnamon was too strong a flavor. I think if I make it again, I would leave out the cinnamon, add some vanilla extract and some lemon or maybe orange zest to brighten the flavor and color.
And one last note..as usual, I halved the recipe, which is really easy to do and that made one loaf. I will give you the recipe to make 2 loaves, however.

Hull and chop the strawberries. Then toast and chop the pecans.
Whisk the dry ingredients in a large bowl.
Then whisk the eggs, sugar and oil in a medium bowl and pour into the dry mixture and stir til well blended.

Stir in the berries and nuts..


And pour into your prepared loaf pans and bake about 55 minutes.


Strawberry Bread ( from "America's Best Lost Recipes Cookbook")
Makes 2 loaves
3 cups AP flour
1 tbsp. ground cinnamon
1 tsp. baking soda
1 tsp. salt
4 large eggs
1 1/2 cups sugar
1 cup vegetable oil
2 cups strawberries, hulled and chopped
1 1/4 cups pecans, toasted and chopped
Preheat oven to 325. Place rack in middle postiion. Grease and flour two 9" x 5" loaf pans.
1. Whisk flour, cinnamon, baking soda and salt in a large bowl.
2. Whisk eggs, suagr and oil in a medium bowl.
3. Make a well in the center of the flour mixture and add the egg mixture to the well and stir til well blended.
4. Stir in the strawberries and pecans.
5. Scrape batter into prepared pans and bake approx. 55 to 60 minutes or til a toothpick inserted into the center comes out clean.
6. Cool in pans 10 minutes, then turn bread out onto a wire rack and cool completely before slicing.
The bread can be store in the refridgerator up to 3 days. I'm not sure how well it would freeze because of the strawberries.( they don't mention freezing in the book.)


Monday, April 12, 2010

Mini Rhubarb Tarragon Muffins

This recipe came out of a French Food and Wine Magazine that one of the Farmer's Market vendors, Bea, gave me to "read". Bea is a wonderful lady who sells honey, among other items, along with her husband Jean-Claude. She is originally from Paris and has been here for 12 years. I looked at all the pictures in the magazine since I only took high school French and I could only make out a few words on my own! I found this one to try, although there were tons of other recipes that looked great.

So with Bea's help, we translated the recipe into English and I converted the grams into cups and this is the result. They came out great, nice and moist. The rhubarb and tarragon is spooned on top with some granulated sugar so when you take a bite, you get all those flavors, plus a little taste of cinnamon. I could have used more tarragon because the flavor wasn't too noticable but I only had a little bit just coming up in my garden. The recipe yielded 8 muffins.

One last thing, I had some rhubarb left in the freezer from these so I used that and it came out fine.

Mini Rhubarb Tarragon Muffins

2 stalks of rhubarb ( I used frozen)
2 sprigs of tarragon
1/2 cup plus 4 tbsp. sugar
1 stick plus 1 tbsp. butter, melted and cooled
2 eggs
1 cup AP flour
1/2 tsp. baking powder
1/2 tsp. cinnamon

Preheat oven to 350. Line muffin tins with paper cups.
1. Place flour, baking powder and cinnamon in a small bowl and stir to combine. Set aside.
2. Cut rhubarb into small pieces.
3. Place rhubarb, tarragon and 2 tbsp. sugar into a small saucepan, cover and simmer for 5 minutes.
4. Beat eggs ( I whisked them), in a medium bowl with 1/2 cup sugar.
5. Whisk in melted and cooled butter.
6. Add dry ingredients and stir just to combine.
7. Spoon batter into prepared muffin cups.
8. Spoon the rhubarb/tarragon mixture onto the batter and sprinkle the remaining 2 tbsp. sugar on top.
9. Bake approx. 20 to 25 minutes. Cool on wire rack.

Friday, April 9, 2010

Chocolate Molasses Cookies

Chocolate and molasses together is a delicious combination and although this is really more of a Fall cookie, I thought that since I had all the ingredients in the house, I'd bake up a few..or rather, a couple of dozen.
The recipe comes from an issue of Country Living from October 2005. Being one to really love cookies with crunch, what these cookies lack in that department, they make up for in flavor. You get a soft cookie with the gooey chocolate, if you're lucky enough to bite into them while still warm.
I would make one small change, however, which would be to increase the amount of chocolate.
The recipe calls for using a 4 oz. bar of bittersweet chocolate, chopped into chunks. Since I only had bittersweet chocolate chips, that's what I used and I don't think it made much of a difference. And to address that crunch issue? A handful of chopped walnuts or pecans might be pretty darn..crunchy!

Begin by sifting the dry ingredients and setting aside.
Then beat the butter and both sugars til light and fluffy.
Add the egg and the egg yolk and mix.

Add the molasses and vanilla and mix. Then add the dry ingredients and mix just til combined.
Stir in the chocolate.
Shape into 2 tablespoon size balls and roll in sugar.
Place on prepared cookie sheet and press slightly with a fork.
Bake about 12 to 14 minutes.

Chocolate Molasses Cookies (from Country Living October 2005 issue)

Makes 2 dozen( I made mine a little bigger and got 18 cookies)
2 1/2 cups AP flour
1 tsp. baking powder
1/2 tsp. baking soda
3/4 tsp. salt
1 tsp. cinnamon
1/2 tsp. ground cloves
10 tbsp. unsalted butter, softened
1/2 cup granulated sugar, divided
1/2 cup dark brown sugar
1 large egg
1 large egg yolk
1/4 cup molasses
1 tsp. vanilla
1 4 oz. bar bittersweet chocolate, chopped into chunks (I would increase this amount)
Preheat oven to 350. Line baking sheet with parchment paper.
1. Sift together flour, baking powder, baking soda, salt, cinnamon and cloves. Set aside.
2. Beat butter with 1/4 cup granulated sugar and dark brown sugar on medium speed til light and fluffy, about 5 minutes.
3. Add the egg and egg yolk, mix to combine.
4. Add molasses and vanilla and mix thoroughly.
5. Reduce mixer to low speed and add the dry ingredients in 2 batches, mixing til just combined.
6. Stir in the chocolate.
7. Shape the dough into 2 tbsp. size balls and roll in remaining granulated sugar.
8. Place on baking sheet, 3" apart and flatten each slightly with a fork.
9. Bake til lightly browned and firm around the edge, about 13 minutes. ( the recipe calls for 14 minutes baking time but it depends on your oven. Mine took 13 minutes.)
10. Cool on wire rack.

Wednesday, April 7, 2010

Chocolate Chip Dream Bars

I must have really wanted to make this recipe..back in June of 1999 because I had saved it since then!
This was torn out of my son Kris's 6th grade school newletter. (Update, Kris is in his last year at Temple.) It's under the heading, "After School Snacks".
Anyway, the recipe is, you guessed it, quick and easy. It really is and it's darn good, too!
I threw it together early this morning, before the 90 degree temps. made my kitchen unbearable.
You can get away with omitting the glaze, but I think it adds a nice look to the bars. So give them a try!
Chocolate Chip Dream Bars
1/2 cup packed brown sugar
1/3 cup butter, softened
1 cup AP flour
2 eggs
1 cup packed brown sugar
1 tsp. vanilla
2 tbsp. AP flour
1/2 tsp. baking powder
1/2 tsp. salt
1 cup semisweet chocolate chips
1 cup chopped nuts ( I used pecans)
Chocolate Glaze ( recipe follows)
Preheat oven to 350.
1. Mix 1/2 cup brown sugar and butter in a medium bowl. Stir in 1 cup flour.
2. Press into an ungreased 13" x 9" pan.
3. Bake 10 minutes.
4. In a medium bowl, mix eggs, 1 cup brown sugar and vanilla.
5. Stir in 2 tbsp. flour, baking powder and salt.
6. Mix in chocolate chips and nuts. Spread over baked layer.
7. Bake 15 to 20 minutes or til golden brown. Cool completely in pan on wire rack.
8. Drizzle with chocolate glaze. Refridgerate til firm, about 1 hour.
Chocolate Glaze:
1 tbsp. plus 1 1/2 tsp. cocoa powder
1 tbsp. plus 1 tsp. butter
2 tbsp. boiling water
1 cup confectioners sugar
1. Cook cocoa, butter and water in small saucepan over low heat, stirring til thin and smooth. Remove from heat.
2. Stir in confectioners sugar til smooth.
Drizzle over bars. ( I placed the glaze into a small plastic baggie and cut a tiny corner off to drizzle.

Tuesday, April 6, 2010

Sunken Chocolate Cakes

I came across this recipe from a tear out in one of Martha Stewart's Magazines. The other side had a photo of what I really wanted to try to make, which is the Chocolate Heart Shaped Cookies called Ice Cream Valentines. I need to make up some ice cream sandwich cookies for a local ice cream shop but I'll save them for another day!

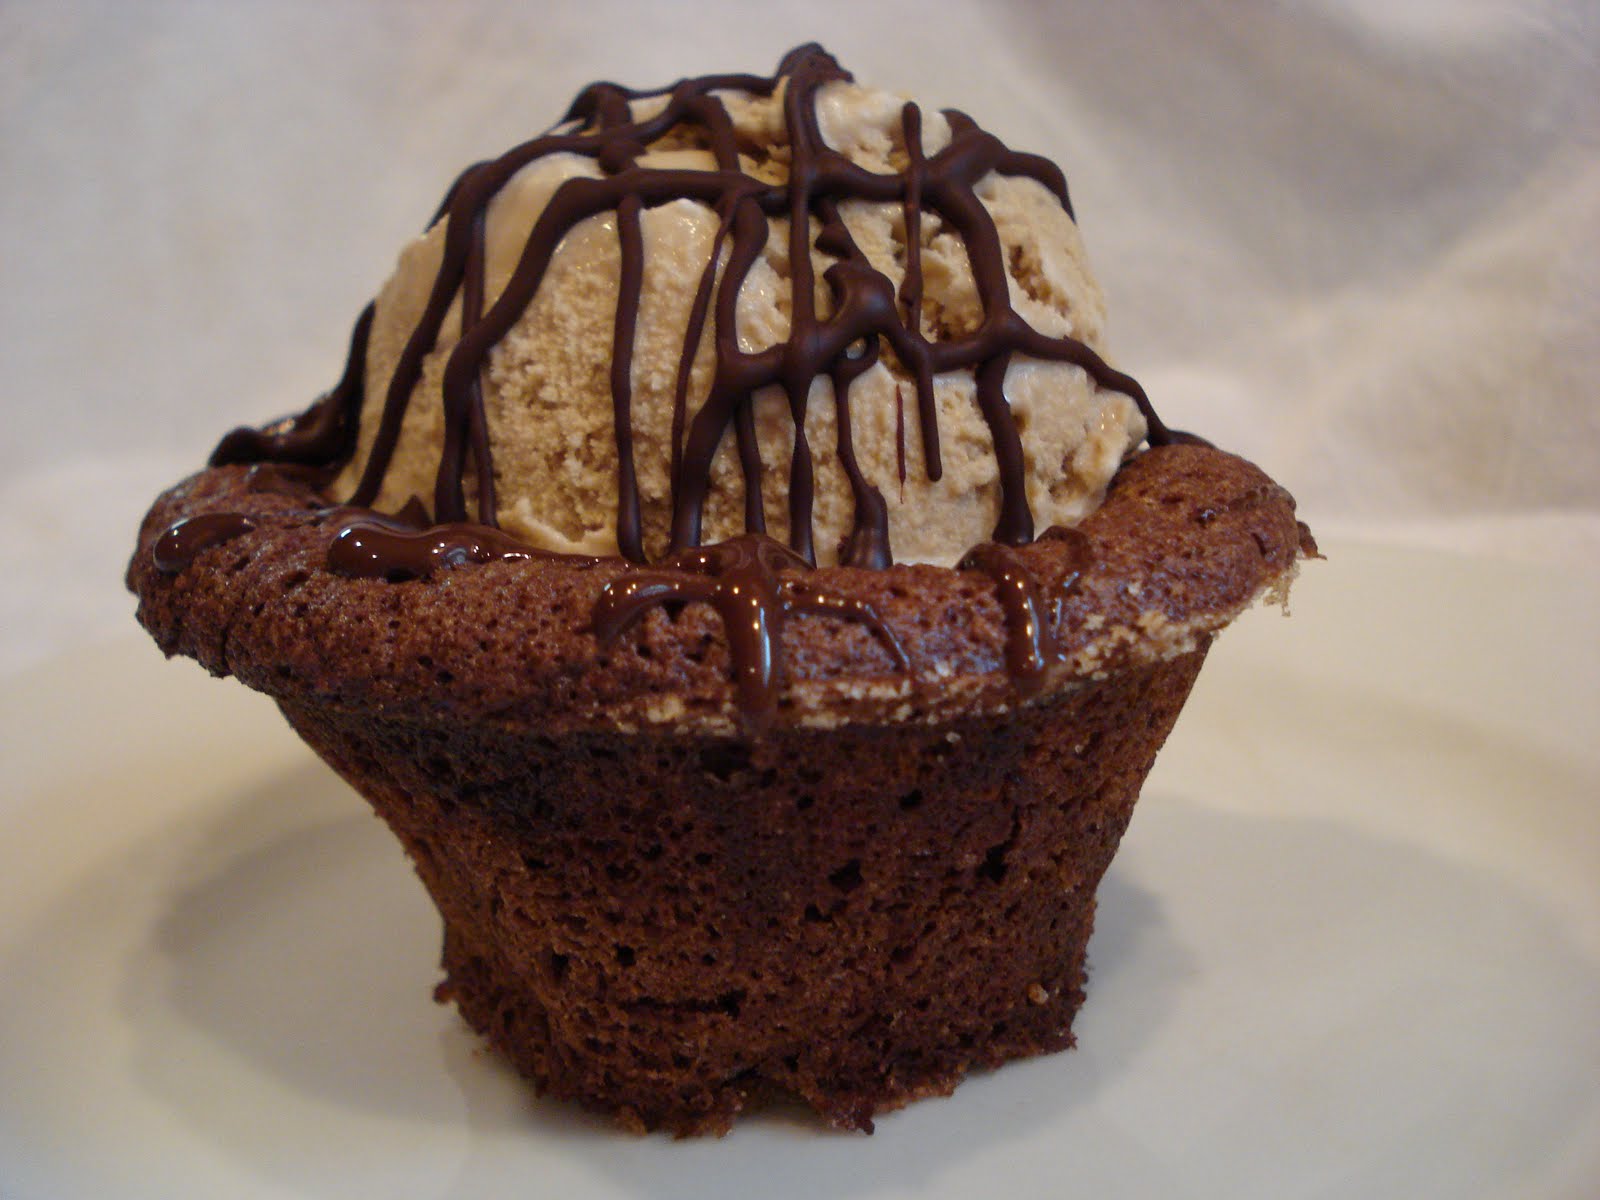
These are really called Sunken Chocolate Cakes with Coffee Ice Cream. I actually had some coffee ice cream in the house so I figured it was meant to be!
They also happen to be gluten free because the recipe only used 5 ingredients, non of them being flour. They're light and really good. And they're really quick and easy, which seems to be a recurring theme for me these days! It's probably the 80 degree weather we're having in early Spring! Also, I again, halved the recipe, but I'm giving you the full recipe which makes 4 jumbo cakes.

In a double boiler, melt the chocolate with the butter and set aside to cool.
Beat the egg whites til soft peaks form.


Whisk the yolks with the sugar til mixture is pale yellow and thick.
Stir in the melted chocolate.
Fold in the egg whites.

Spoon into a prepared muffin pan and bake about 20 minutes.


Let them cool 15 minutes in the pan. They will sink in the center, which makes a perfect sunken spot for plopping some coffee ice cream!
Or..how about some fresh fruit with whipped cream on top? Sounds good to me!

Sunken Chocolate Cakes with Coffee Ice Cream ( from Martha Stewart)

8 tbsp. ( 1 stick) unsalted butter, cut into pieces, plus more for pan
1/4 cup sugar, plus more for pan
5 oz. best quality bittersweet chocolate, coarsely chopped
2 large eggs, separated, plus 2 large egg yolks
4 scoops coffee ice cream
Preheat oven to 350.
1. Lightly butter 4 cups in a jumbo nonstick muffin pan, leaving the 2 center cups empty. Coat lightly with sugar and set aside.( I halved the recipe and used a regular muffin pan to make 6).
2. Place butter and chocolate over a double boiler and melt on low, stirring occasionally til melted. Remove from heat. Set aside to cool.
3. Combine the 4 egg yolks with 2 tablespoons sugar and whisk til the mixture is pale yellow and thick.
4. Stir in the melted chocolate and butter mixture.
5. Beat the egg whites til soft peaks form, add remaining 2 tablespoons of sugar and beat til stiff and shiny but not dry.
6. Fold into the chocolate mixture.
7. Divide batter among prepared muffin cups and bake til set and slightly springy to the touch, about 25 minutes. Remove from oven and transfer to wire rack to cool in pan 15 minutes.
Carefully run a knife around the edges to unmold. Serve with a scoop of coffee ice cream.
* I added the drizzled chocolate to the ice cream..just because!*


Monday, April 5, 2010

Mini Fruit Tarts

I wanted to offer something a little different for the Farmer's Market this weekend since it was a Holiday. I decided to keep the tartlette idea going and chose to make these sweet pastry crust mini fruit tarts.
The crust was easy to make and easy to handle and the filling went together in no time. I actually had fun creating different designs out of the berries. I found the recipe here and used cream cheese, rather than mascarpone cheese. The recipe made 4 mini tarts.
I read, somewhere online but I can't remember where, about pouring a layer of chocolate onto the baked crust before you fill the tart with the cream cheese filling, to keep it from becoming soft. That's what I did and these were so good!

Fresh Fruit Mini Tarts( adapted from joyofbaking)

Sweet Pastry Crust

1 1/2 cups AP flour
1/8 tsp. salt
1/2 cups unsalted butter, room temp.
1/4 cup sugar
1 large egg, lightly beaten
Filling:

1/2 cup mascarpone cheese or cream cheese
1/2 cup heavy whipping cream
1 tbsp. granulated sugar
1/2 tsp. vanilla

1. To make crust: Sift or whisk flour and salt. Set aside.
2. Place butter in mixer bowl and beat til softened.
3. Add sugar and beat til light and fluffy.
4. Gradually add beaten egg, beating just til incorporated. Don't overmix.
5. Add flour mixture all at once and mix on low til it forms a ball of dough. Don't overmix dough or it will be hard when baked.
6. Place dough on plastic wrap and shape into a disc and refridgerate til firm, approx. 30 minutes.
7. Roll dough out to 1/8" thick. Place dough into fluted tart pan with removable bottom and prick all over bottom with a fork.
8. Place back in fridge 20 minutes.
9. Preheat oven to 400 and, when chilled, line crust with foil and fill with dried beans or rice.
10. Bake 20 to 25 minutes or til golden. Cool completely before filling.
**At this point, if you'd like, you can melt some semisweet chocolate in a double boiler and pour and spread a thin layer of chocolate onto the baked cooled crust.
Filling:

1. Place all the ingredients into a mixer bowl and beat til smooth.
2. Fill tart with filling and decorate with fresh blueberries, raspberries, strawberries or any other fruit you like.
3. Warm some fruit jam, such as apricot, peach, blackberry, etc. and brush over fruit to give a nice shiny look. Refridgerate til ready to serve.

Thursday, April 1, 2010

Lime Curd and Toasted Almond Tart

Yesterday could well have been my April Fools Day! This tart recipe put me over the edge, between making the curd and then the crust. And it was all because of me, not the recipe!
It is my submission to the gourmetunbound site for this month. The recipe is from Gourmet April 1996 issue and the end result is great!
I read the reviews for the recipe, finding that many of the bakers said that the curd was runny. So I decided to try a few other recipes also, just in case the one that went with this recipe did turn out runny.
I can't believe there are so many different recipes for curd!
First the Gourmet recipe. It did come out a little thinner than the others I tried but really it was fine.
Then I read Ina Garten's recipe for lime curd, and noticed her recipe was almost exactly the Gourmet recipe.
Next I made Martha Stewart's Lime Curd recipe which came out just like mine.
Then I decided to use my recipe for lemon curd, just subbing limes for lemons and it came out fine also. Whew!! That was alot of curd making!
Then, the crust..oh the crust!
I first made the crust using some of my almond biscotti, rather than the vanilla cookie crumbs called for in the original recipe. I've been wanting to use the biscotti for a while to see how it would come out and it was great. But the first time I made the crust I put a whole stick of butter rather than a half.. Disaster in the oven! The excess butter made the butter melt and drip onto the bottom and the oven gave off huge amounts of smoke like I couldn't believe! I had to open all the windows and turn on the fan to air the house out! At this point, I figured I'd better wait til morning to start all over again!
So, that was my crazy day in the kitchen.
This recipe is really delicious, though and well worth the effort, which if you make it correctly and pay attention to your ingredient amounts..unlike me..you'll be fine!
I did make small tarts and I filled them with the Lime Curd from Gourmet's recipe. The amount, using my recipe would have to be doubled to fill one whole tart.
So give it a try. And don't forget the whipped cream!
Lime Curd and Toasted Almond Tart ( from Gourmet Magazine, April 1996 issue)
Crust:
2/3 cups sliced almonds, toasted til golden and cooled completely
1/4 cup sugar
1/4 tsp. salt
1 cup vanilla wafer crumbs ( I used almond biscotti crumbs)
1/2 stick butter
Filling:
1 cup plus 1 tbsp. sugar
1 stick plus 1 tbsp. cold unsalted butter, cut into pieces
4 large eggs, beaten lightly
1/2 cup fresh lime juice, from about 4 limes
1 tbsp. lime zest ( from about 2 limes)
**Note: I didn't choose to make the compote which accompanied this recipe**.
Preheat oven to 350 and butter a 9" tart pan with removable fluted sides.
1. In food processor blend almonds, sugar and salt til almonds are finely ground.
2. In bowl, toss the almond mixture with cookie crumbs and butter and combine well. ( I used my fingers to combine).
3. Sprinkle some of the mixture into the pan, starting along the edges, pressing against the rim. Then fill in the bottom with the mixture, pressing evenly and joining edge.
4. Bake crust in lower third of oven for 10 minutes or til nicely golden. Cool completely.
Filling:
1. In heavy saucepan, cook sugar, butter, eggs and lime juice over moderately low heat, whisking constantly, til mixture thickens and shows marks of whisk, about 10 to 15 minutes.
2. Immediately pour through a sieve, then add the zest and cool. ( This mixture can be made 1 week ahead and chilled. Be sure to place a piece of plastic directly on top of curd to prevent a skin forming).
3. Spoon filling evenly into crust and cover surface with a buttered round of waxed paper. Chill at least 1 hour or up to 24 hours.
Garnish with whipped cream and, if not using the compote, decorate with some strawberries, blueberries or thin lime slices.

LinkWithin

Related Posts with Thumbnails